No Posting While Toasting: New "Drunk Locker" App Blocks Your Social Media During Drinking Time


Anyone with social media, a smartphone, and a proclivity for partying knows this story.  You're out with friends, sipping a few libations, and suddenly the next morning there's love notes to tequila and photos of you attempting to twerk all over your facebook feed.  If you're the sort who'd rather outsource self-control to a technological bouncer, you need the new Drunk Locker app.

"I just told Facebook that the next three people who come party with us can do shots out of my cleavage...HAHAHA AWESOME IDEA, RIGHT?"
(Image courtesy gettyimages.com.)

Drunk Locker, according to its creators, acts as a "binary conscience" during your benders.  Simply put, it prevents you from accessing six major social media interfaces while you're 'faced.  Facebook, Messenger, Snapchat, Twitter, Instagram, and Tumblr are all strictly prohibited for use while juiced. A predetermined time selection (from one to ten hours) allows for your sober judgement to keep you out of social harm's way, and nothing (even uninstalling the app) will stop Drunk Locker from that mission.

Drunk Locker is free, so you'll still have plenty of beer money.  And then you might need Drunk Locker more than ever.

SHUT UP WINE, YOU'RE WRONG.
I'm sorry I yelled at you.
I love you.
Let's just send a smiley face...
(Image courtesy theluxuryspot.com.)

Networking in Swift: Building the Swift Client, Part 5

This is the final article in our tutorial segment on building a Swift client application to query a RESTful API and serve the response to the end user in a table view. If you've been following along since the introductory article, we've come a long way, and we're almost done! But we're not at our final destination just yet.

When we last left off in part four, we had added the necessary code to display thumbnail images next to our lists of inventory items. In this article, we will walk through the process of adding views for each individual item in our inventory such that when a user taps an item in the list view, she'll be presented with an item description scene that displays: 1) a bigger picture of the item, 2) the name of the item, and 3) the lengthy item description provided by the API. Let's jump right in.

The Item Description Scene
We will now set up our final story board scene. When the user taps on an inventory item from among those listed in the table view, we want to display a new view that provides an image at the top of the screen and below it a scrollable content area that displays the description text for the selected item. Create a new file,  and name it PlumbingSupplyItemDescriptionViewController:


Switch over to the main storyboard and drag a view controller into the scene. Next, drag in an Image View and place it to the top of newly added view controller. Give the Image View a height of 160 points using the size inspector in the utilities panel. With the Image View selected, bring up the 'pin' popover view as shown below:

Within the 'pin' view, uncheck the 'Constrain to margins' box and select the horizontal red bars and the top vertical red bar. Also check the 'Height' box as shown below:

Finally, click the button that reads 'Add 4 Constraints.' If done correctly, you should see no red or yellow lines near the Image View:

Now drag and drop a Text View into the scene, and size it as shown below with a small margin all around. (The vibrant color you see in the image below on the Text View was set by us so that it is clear what object we are referring to).

While the Text View is selected, bring up the 'pin' menu again, uncheck the 'Constrain to margins' box, and select the horizontal red bars and the vertical red bars as shown below, and then add the constraints:

We will now make the view controller that we dragged into our storyboard be of type PlumbingSupplyItemDescriptionViewController. Ensure that the view controller is selected. From the Identity Inspector menu locate the Class field and type in PlumbingSupplyItemDescriptionViewController as shown here:

Open the Assistant Editor. You should now see the main storyboard with our selected view controller along with the corresponding class. To the top of this class add the following code:

Like so:


To link these IBOutlets (@IBOutlet) to the elements to our main storyboard, we select the given element on the story board with [control+left mouse button] and drag the blue line over to the corresponding variable as shown below:


Do this for both elements in the view controller (i.e. the image and the text), connecting them to the corresponding outlets in the class.

When we select a table view cell from our list of inventory items, we want our newly-added view controller to be presented to the user. To do this we will [control+left mouse button] from the table view cell located in each of our table view controllers and drag the blue line over to the new view controller. Do this for both table view controllers. When the drop down menu appears select 'Show.'

From Apple Docs: “The Navigation Bar provides a control for navigating hierarchical content. It’s a bar, typically displayed at the top of the screen, containing buttons for navigating within a hierarchy of screens." To prevent the Navigation Bar from overlapping our Image View, we need to set some properties in the main storyboard. Ensure that the newly-added view controller is selected. From the Attributes Inspector menu locate the check box labeled 'Under Top Bars' and uncheck it. Run the application, navigate to one of the two categories and select one of the item table view cell. You should see a view similar to the following:


Item Description Scene: Displaying Image and Text
When using storyboards with segues, the system provides a callback method to the source view controller for when the segue is about to be performed. This allows us to prepare the destination view controller for its presentation onto the screen. (A segue is triggered when we select a table view cell that was linked to some view controller using a storyboard segue.) Ensure that the callback method is located in the PlumbingSupplyInventoryTableViewController class like so (by default it is supplied in the class but commented out):

Uncomment this code block if it is commented out, and replace the comments in this callback method with the following snippet:

On the first line, the segue object provides a reference to the destination view controller. On the second line we cast the sender object that the callback method provides as a table view cell since the cell that was selected becomes the sender of this segue event. Then we grab the index of the selected cell, on line three, and use it to retrieve the associated plumbing supply item from our data source and send it over to the destination view controller on line four. To avoid having to download the image again we simply capture it in our destination view controller from the selected table view cell.

Now back to the destination view controller class, a.k.a the PlumbingSupplyItemDescriptionViewController. Define these three functions:

The viewDidAppear(animated: Bool) function is a system method that we override with custom behavior after the view appears onto the screen. In this method we set the title of the view controller to the name of the selected item and call a function that downloads the description of an item. Replace the comment, '// title and download //,' within this method with the following snippet:

Notice that the item description text is passed through a completion handler closure once the download is complete. The code 'self.bsn_textView.text = itemDescription' sets the Text View's text area with the text of the item description. On the source view controller, we did not use this completion handler, which is available on its networking request method, but instead made the UI updates inside the method itself. We prefer to update the UI outside of the method that is tasked to download content as it makes for clearer code by breaking up the variegated logic into separate sections. Both approaches are possible, as we'll now see.

In the function urlForItemWithDescription(itemID : String) -> (NSURL?) add the following lines of code:

This method takes an item's id, maps it one of two possible endpoints and inserts that item id into the selected endpoint. The mapping is done by inspecting the first two characters of an item's id and using a switch statement.

In the function, requestItem(endPointURL : NSURL?, responseHandler : (. . .) -> () ) -> (), add the following code:

This code should look familiar. We already described what this code does when we originally downloaded inventory items. The only difference here is that we passed our data for the UI element to the completion block.

For our final function, i.e. the system function viewDidLoad(), place the following code within it:

The first line of code takes the captured image that was assigned to us by the source view controller and insert it into our Image View. The second line sets the font type and size of the items description. The third line disables editing of the Text View since this functionality should not be applicable. The fourth line displays text that serves to indicate that there is activity with getting an items description. Run the application and navigate to the item description page. You should see a screen similar to the one depicted below:

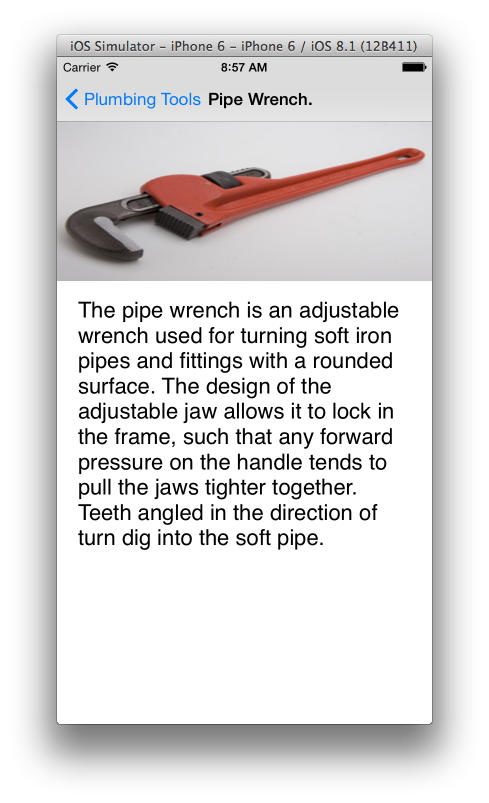
Success!  With that, we've completed the last major task for our Super PHPlumbing Bros Swift client application! When run, the client queries our custom API to first display the titles of the two inventory categories supplied by the API. When the user selects one of those categories, the app displays a list view of the inventory and provides each item's name along with the corresponding thumbnail image. And finally, when the user selects an individual item, the app displays the full image along with the item's full description.

This project can be found on GitHub.

We hope you've found this tutorial series helpful and fun. As always, questions, comments and suggestions are welcome below!

Index
Introduction
Introduction and Overview: From the Back End API to the End User Application

The Web API
Building a RESTful API in PHP, Part 1
Building a RESTful API in PHP, Part 2

The Swift Client App
Networking in Swift: Building the Swift Client, Part 1
Networking in Swift: Building the Swift Client, Part 2
Networking in Swift: Building the Swift Client, Part 3
Networking in Swift: Building the Swift Client, Part 4
Networking in Swift: Building the Swift Client, Part 5

This tutorial was authored by Stefan Agapie, a Senior iOS Software Engineer, and adapted for the present piece. 

Space Station Sunday: Many Happy Returns

Good evening space fans!  After 165 days in orbit, the three crewmen of Expedition 41 were safely re-embraced in the grasp of gravity last Sunday night.  The Soyuz landing craft departed the ISS flawlessly and touched down in Kazahkstan some 3 hours later, returning NASA astronaut Reid Wiseman, ESA astronaut Alexander Gerst, and cosmonaut Maxim Suraev back to their home planet.

The outside looks crispy...


...but the crew stayed cool.  Here, Reid Wiseman is shown before he's regained the use of his Earth-legs.
(Images courtesy NASA.gov.)

In a video interview with NASA public relations officer Dan Huot conducted shortly after the landing, Wiseman lauded the tight-knit crew's scientific diligence, and was quoted as saying, "The ride {back} was awesome."

According to NASA.gov, NASA astronaut Terry Virst, ESA astronaut Samantha Cristoforetti, and cosmonaut Anton Shkaplerov are currently in residence at the Cosmonaut Hotel near the Baikonur launch facility in Kazahkstan, conducting fit checks and preparing for their launch to the station next Sunday.  The team will ride in a Soyux TMA-15M to the ISS to join the three Expedition 42 crewmembers at their floating post.

Go team!  Safe travels.
(Image courtesy the ESA's Flickr.)

Meanwhile, the three crew remaining aboard the ISS remained busy, with Commander Butch Wilmore (NASA) working in the Destiny module on the Seedling Growth experiment, which analyzes new ways for food and oxygen to be cultivated in space.  Plants are subjected to different wavelengths of light (red waves being longer, blue being shorter) during growth, and then compared with similarly-controlled plants' data (including genetic information) back on earth.

Human biological science was also assessed, with Wilmore collecting blood and urine samples, and cosmonauts Yelena Serova and Alexander Samokutyaev undergoing hearing tests.  All data collected will be, among other observations, part of an ongoing study that determines how microgravity affects humans.

Cosmonauts Samokutyaev and Serova transferred cargo from the recently-arrived Progress 57 resupply ship into the appropriate locations on the ISS.  Wilmore pitched in with the heavy "lifting" too, when taking "out" a bag of trash.

Floating garbage only works well in a contained space environment.  In NYC it'd get horrifying really fast.
(Image courtesy NASA.gov.)

A small piece of space debris from a Chinese satellite prompted the ISS to make a Pre-Determined Debris Avoidance Maneuver (PDAM) on Wednesday, according to NASA.  Swooping the station out of the path of the spent Yaogan 12 satellite, the maneuver also put the station in better orbital alignment for the upcoming Expedition 42 arrival.  The station now currently resides at 262.3 x 252.0 statute miles up.

Stay tuned for the arrival of the new Expedition 42 crew next week!  Watch this space!

The Expedition 41 team were greeted with a traditional Kazakh ceremony, but is seeing the world up close still as interesting after having been aloft for so long?
(Image courtesy NASA.gov.)

Networking in Swift: Building the Swift Client, Part 4

This is part four in our tutorial series on building a Swift client application to query a RESTful API and serve the response in a list view to the end user of our app. When we left off in part three, we had successfully created a list view of the items in the two inventories supplied by the API. But a simple list of item names isn't very exciting. Let's add thumbnail images to display alongside the item names in our inventory listings.

The images we'll display alongside our inventory items are not stored within our Xcode app bundle, rather, if you recall, they are served up by our custom API along with item id's, names, and descriptions. We will therefore download the inventory item images and display them to the left of our item names. You can download the image assets from our Git repository for the project here, so as not to have to create mock image files with the appropriate file names yourself. After you've downloaded the files, place them in an appropriate folder alongside the other files for your inventory API.

Multithreading in Swift
All user interface related events, touches as well as view updates, occur on the main thread. Thus, if we perform operations that take a long time to complete, this will block or prevent the user interface from responding and or updating view elements—this is not desired behavior since it makes for a terrible user experience. To prevent blocking the user interface from receiving touch events while we download an image, we will download images on a secondary thread.

To get images we need their URLs. Recall that within our item model object (i.e. our PlumbingSupplyItem class) we have a property called 'bsn_image'. This property holds a URL to a unique image that corresponds to the item name in the same model object. 

In our PlumbingSupplyInventoryTableViewController class, we'll thus create an operation queue that will run on a thread other than the main thread. Toward the top of that class type the following line of code:

The string in the quotation marks here is completely arbitrary, and serves to avoid name collisions. In the function func tableView(tableView: UITableView, cellForRowAtIndexPath indexPath: NSIndexPath) -> UITableViewCell, add the following snippet:

The first line of code (line 2) gets the image URL for the cell that is about to appear onto the screen. We will use this URL to download the corresponding image. The second line of code (line 4) is a call to the dispatch system. It copies the code that is nested within the closure and places this copy on our backgroundQueue. The code within the closure comprises an operation. Our backgroundQueue will then dispatch the copied block of code at a system determined time—in the immediate future. This is known as executing an operation. (The code above is structured in such a way that, for each instance of a cell that appears onto the screen, an operation is spawned and placed onto our operation queue. For example, when our table view first loads we have at most the same amount of operations as there are visible cells.) For our next line of code, currently just a comment, we want to capture the index of the cell that is requesting this image download operation. As a result, each operation on our queue will have a record of the cell's index that requested this operation. Now place the following line of code under that comment (on line 6):

For our next lines of code, currently just a comment, we retrieve an image's URL and begin downloading it. The NSData class has the following method that will synchronously download some data from the provided URL. (Synchronously, in this context, means that the request will block our thread, but not the main thread, until the download is complete. This is desired because we want the image's data to download before proceeding to the next lines of code that processes and displays the images). Add the following code below the relevant comment:

On the next line of code we verify that the image was downloaded without a hitch. If the image failed to download, then the error object would not be nil. Since displaying an image in an already displaying cell is considered a user interface update, it must occur on the main thread or else our images will not get displayed. To accomplish this we will dispatch operations to the main queue; on the next line of code, the call to the dispatch system does just that. For our next line of code, currently just a comment, we create an UIImage object from the raw downloaded data. Place this line of code under the relevant comment:

The following line of code gets the index of the cell that corresponds to the cell that spawned this image download operation. Place this line of code under the relevant comment:

Now locate the if-statement with the text, '/* compare indices */', and replace the comment with the following line of code:

This if-statement compares the captured cell index to the cell's current index. If the captured cell index is equal to the current cell index, then the cell that requested the image is still on the screen. We therefore present the downloaded image by executing the code that is nested within this if-statement.

When scrolling the table view,  the cells are reused to improve performance. When a cell is scrolled off the screen, instead of being purged from memory it is instead reused with a new index assigned to it. The issue is that when a cell is reused and subsequently redisplayed onto the screen, the cell spawns another image download operation which puts us in a state where we have more than one operation associated with any given cell.

To understand the issue here, suppose that the user scrolled the table view enough times that a single cell has four associated image download operations. When the individual operations complete their task, they message the cell by attempting to load an image into it. The visual result of four operations loading an image into one cell is a rapid succession of images changing as each operation loads its image. This behavior is not desired. Also, since the images may not download in the same order in which they were requested, we may wind up displaying the wrong image—this is bad!

The next two lines of code set the image on the current cell and tells the cell to lay out its cell for the newly provided image. Run the app and select one of the two plumbing supply categories. You should now see a table view with images and associated text as depicted below:
Success! We've displayed the relevant thumbnail images alongside the names of the items in our inventory lists. We're almost done! In the next and final article in the series, we will construct our individual item detail views. But before we conclude, let's return to the image-display issue mentioned above. 

To see the effect of allowing each operation to set a cell's image by not checking cell indices do the following. Comment out the if-statement: if currentIndex?.item == capturedIndex!.item). Now locate this line of code: self.dataSource = self.inventoryItems(data). Just below that line, load the data source multiple items by adding this line of code: for index in 1...5 { self.dataSource += self.dataSource; }.

Run the app and select one of the two categories. On an inventory items list page, quickly scroll down to the last element, you should see the images changing in rapid succession! To fix this effect, uncomment the if statement code only. Run the application again and quickly scroll to the last element. The issue should have been fixed.

It's good practice to cache data that is expensive to download. In our example, every time we scroll to a cell with an image that has already been shown, we don't request it from a local memory cache but instead download it every time. Our accompanying project repository contains sample code with a cache implementation. Simply comment out existing code and uncomment 'Version Two' sample code for a caching implementation—located in two places. If you run this implementation you will notice that the images load much faster when scrolling. This is highly desired behavior. 

This project can be found on GitHub.

That's it for the present piece. In the final article in the series, we will construct our individual item detail views.

Index
Introduction
Introduction and Overview: From the Back End API to the End User Application

The Web API
Building a RESTful API in PHP, Part 1
Building a RESTful API in PHP, Part 2

The Swift Client App
Networking in Swift: Building the Swift Client, Part 1
Networking in Swift: Building the Swift Client, Part 2
Networking in Swift: Building the Swift Client, Part 3
Networking in Swift: Building the Swift Client, Part 4
Networking in Swift: Building the Swift Client, Part 5


This tutorial was authored by Stefan Agapie, a Senior iOS Software Engineer, and adapted for the present piece. 

New "Tinder For Jobs" App: Score A Job As Easily As A Date?


If you're willing to meet strangers via an app to make your life better via intimate encounters, why not also meet strangers who'll make your life better by giving you a job?  That's the idea behind a new app that hails itself as "Tinder for jobs."

The nspHIRE app (pronounced "inspire") was recently created by a Chicago startup, amid a slew of other Tinder-type notions.  The app uses LinkedIn information to help users create a profile that is essentially their resume.  Employers can then contact desirable candidates and chat with them for $.99.

"Think it's worth a buck to laugh at this nerd's 'references'?"
(Image courtesy ceiainc.org.)

The "swiping right" acceptance that is inherent to the original Tinder app works here too.  Prospective employees "swipe right" on jobs they are interested in, and are notified of a match if employers swipe right on them as well.  Anonymous posting abilities allow for you to seek a new gig on the down-low.  An in-app chat service allows for communication.

As reported by chicagoinno.streetwise.co, nspHire co-founder Rasheen Carbin explained, "The idea of mutual match was very attractive to us because it solves the biggest problem with job boards. If you’re a candidate, when you press submit, you have no idea what happens. For the most part whoever that goes to, that person is probably never going to look at your resume. And if they do, maybe they’ll give it 6 seconds."

Thus, if employers are willing to pay $.99 to look at you, perhaps they truly feel you're more worth their while.  Some 500 downloads for the Android version of the app have already taken place, with the majority being jobseekers.  The iOS version, to be released soon, will incorporate a projected initial 20,000 workers and 2,000 employers.

Just don't confuse it with actual Tinder, or your job could get weird.
(Image courtesy huffingtonpost.co.uk.)

Droneland Security: Predator Aircraft Guard Mexican Border; Canada Next


Drones...they're gaining popularity for everything from firefighting to delivering burritos.  Yet it is their sociopolitical applications that currently seem to have the most attention.  Perhaps it is because they will help save the lives of military and law enforcement, or perhaps it is because of their manageability.  Now, they have been tasked with acting as border patrol agents, but with mixed results.

As reported by arstechnica.com, the U.S. Customs and Border Protection (CBP) now uses drones to patrol over half of the U.S.-Mexico border.  Using Predator B-type drones, videos are taken over certain areas, and then subsequently re-shot several days later.  This enables CBP to examine the photographed terrain for noticeable changes, such as vehicle tracks or footprints from humans and livestock.

One major benefit of drones is that they'll patrol the desert as readily as a nice beach.
(Image courtesy student.societyforscience.org.)

"Law-abiding people shouldn't worry" and "cameras are unable to capture details like license plate numbers and faces on the ground," Lothar Eckardt, CPB's executive director of national air security operations, told the Associated Press. This is not as reassuring as the actual results of the program.

A mere 2% of the missions indicated evidence of illegal border crossings, and those areas were then secured by more thorough "ground sensors" by CPB. Another 2% were inconclusive, and 4% were false alarms. It is difficult to determine if the drones simply didn't find any evidence or were not able to look hard enough.

Nevertheless, the program is set to move up to the Canadian border in 2015.  The original "change detection" program over the U.S.-Mexican border was launched in 2013.

Does anyone else want to see a buzzard or vulture pick a fight with a mountain-region drone?
(Image courtesy deadlinelive.info.)

One For The Road: New Bike-Bottle Device Harvests Moisture As You Ride


Sustainable energy comes in many forms, but what about the fuel you'll need to sustain yourself?  A new invention can keep you happily hydrated by culling water from the atmosphere and delivering it straight into your bike bottle...no rest stops required.

Unless you need to check the map.  Again.
(Image courtesy adventurecycling.org.)

The Fontus, as reported by the Atlantic, is a new invention that is a simple and effective means of keeping a constant water supply, even if you find you've ridden your bike to the middle of nowhere.  Austrian creator Kristof Retezár designed the Fontus to be a sleek, unobtrusive bike-mounted device that funnels air through a top chamber to remove the inherent moisture. The air then settles over a "condensing structure" and a solar-powered cooler drips the water into your bike bottle.


In humid conditions, the Fontus could provide 17 ounces of water per hour for a cyclist. Eventually, it could be brought to remote areas of the world to improve quality of life where humidity is high but groundwater is scarce. Many areas in South America, Africa, and Southeast Asia in particular could benefit from this innovation.

Sustainability's many styles are inspiring some amazing inventions to roll out. And just think, if the cyclist was also harvesting their own pedal-powered electricity, they'd be a one-person transport, water, and power supply! Now if there were only a way to grow energy bars en route as well...

Nutrition on the road is serious business.
(Image courtesy si.wsj.net.)