 |
| No word on whether the app yet recognizes the elusive "Pac-Man Pine." (Image courtesy pinterest.com.) |

Showing posts with label online learning. Show all posts
Showing posts with label online learning. Show all posts
All The Glory Of The Natural World - Identified By App
It's been unseasonably warm in many parts of the country, and that means plants might still be present in your neighborhood. If there's a certain bit of flora that's been beyond your categorization, now, you can use a variety of apps to get to the bottom of these pretty mysteries...
Learning Is Earning: 8 Online Courses That Improve The Richness Of Your Life (And Maybe Your Wallet)
Do you like learning things, but don't want to spend thousands at college? Do you have an insatiable lust (or even mild affinity) for knowledge, but you dislike the classroom or tutor dynamic, and you don't like even just waking up in time to stuff stuff into your head? Now, you can use the Udemy website to become more intelligent on a variety of topics so vast, you'll be smarter just knowing that it's possible to study these things. Here are just a few of the new things we recently learned we could learn online...
 |
| If you're reading this, you may have already taken the first step towards getting really good at a new skill. How exciting! (Image courtesy extremetech.com.) |
How To: Install an Ubuntu Server Virtual Machine in VirtualBox

We'll use Ubuntu Server our guest operating system for its relative ease of use and because there is already a large amount of support information that can be found online for its setup and maintenance in VirtualBox. I'll be using the 64-bit version of Ubuntu Server 14.04.3. Make sure you choose the version with the correct architecture for your system: 32 vs. 64 bit. Download a copy of Ubuntu Server from the link.
PyGest: A Python tkinter Tutorial, Conclusion
This is the final article in our Python tkinter tutorial series. If you've been following along from the beginning, you should now have a desktop file hashing application with a fully functioning graphical user interface! Here is our final product:

PyGest: A Python Tkinter Tutorial, Part 5
This is part five in our Python tkinter tutorial series, in which we are building a simple GUI app to process and check file hash digests. In the previous two articles (part 3 and part 4), we configured the input and output widgets for our app. In this post, we're going to build out our app's two primary buttons and hook them into the appropriate input and output fields.

PyGest: A Python Tkinter Tutorial, Part 4
This article is part four in our ongoing Python tkinter tutorial series. When we left off in part three, we had just completed configuring the inputs for our interface, which included text entry, label and button widgets. We'll now move on to the widgets necessary for conveying the application's two outputs: 1) the hash digest value of the file input supplied by the user, and 2) a message indicating whether the file hash generated by the app matches the optional hash value that may be supplied by the user.
PyGest: A Python Tkinter Tutorial, Part 3
This is part three in our Python tkinter tutorial series on building a simple GUI app to compute and check file hash values. In part two, we added a banner header to our bare bones view by inserting a tkinter label into our app's content frame. In this segment, we will build out our app's various input widgets. Recall our mockup design:

True Story: New "StoryCorps" App Aims To Preserve Diverse Histories
Since the dawn of mankind, humans have passed down traditions, songs, legends, folklore, family history, and more via the medium of storytelling. In modern day, transcribed oral histories have lent insight into some of the most important events of recorded time. Now, a method to preserve these tales for the ages has been made easy in app form.
 |
| "That's how much of my intestinal tract the German bomb eviscerated, but I still bayoneted five of 'em before I passed out." -"Uh...Dad, weren't you born in Ecuador? In 1950?" (Image courtesy lifehacker.com.) |
PyGest: A Python Tkinter Tutorial, Part 2
This is part two in our Python tkinter tutorial series. In part one, we defined the basic structure of our script, set up a logger, and got the root window of our GUI application up and running in the app's single view class. In the present article, we'll begin work on the main view in earnest. We will configure the tkinter root object, create and configure a single frame to hold all the app's contents, and then create our app's title banner. First, however, we should discuss how to structure the layout of a Python tkinter application, and our strategy for doing so in the present project.
PyGest: A Python Tkinter Tutorial, Part 1
This is part one in our tutorial series on building a simple Python GUI app with tkinter. You can find the introductory article to the series at the link. In this article, we'll get things up and running by filling out the basic structure for our Python script and the application itself. We'll add a top level comment, define the necessary imports, set up our main name space, define the main function, and then configure a logger to aid in sanity checking . . .
PyGest: A Python tkinter Tutorial, Introduction
Swift Networking Tutorial Index: Building a Swift App to Query a Custom API
Our tutorial series on networking in Swift provides a detailed, practical overview of the topic from the back-end API to the end user application. The series is broken up into two major parts. In the first part, we build a custom web service in PHP which provides access to a RESTful API that serves inventory content from a hypothetical plumbing supply shop. Knowing how to create a simple API is useful for delivering mock content during your app development cycle, and provides application developers with more knowledge on precisely how such a service is constructed. In the second part, we use table views to create a Swift application to query our custom API and deliver the contents of the service to the end user of the application. Use the index below to navigate the tutorial.
Introduction
Introduction and Overview: From the Back End API to the End User Application
The Web API
Building a RESTful API in PHP, Part 1
Building a RESTful API in PHP, Part 2
The Swift Client App
Networking in Swift: Building the Swift Client, Part 1
Networking in Swift: Building the Swift Client, Part 2
Networking in Swift: Building the Swift Client, Part 3
Networking in Swift: Building the Swift Client, Part 4
Networking in Swift: Building the Swift Client, Part 5

This tutorial was authored by Stefan Agapie, a Senior iOS Software Engineer, and adapted for the present piece.
Introduction
Introduction and Overview: From the Back End API to the End User Application
The Web API
Building a RESTful API in PHP, Part 1
Building a RESTful API in PHP, Part 2
The Swift Client App
Networking in Swift: Building the Swift Client, Part 1
Networking in Swift: Building the Swift Client, Part 2
Networking in Swift: Building the Swift Client, Part 3
Networking in Swift: Building the Swift Client, Part 4
Networking in Swift: Building the Swift Client, Part 5
This tutorial was authored by Stefan Agapie, a Senior iOS Software Engineer, and adapted for the present piece.
Networking in Swift: Building the Swift Client, Part 5
This is the final article in our tutorial segment on building a Swift client application to query a RESTful API and serve the response to the end user in a table view. If you've been following along since the introductory article, we've come a long way, and we're almost done! But we're not at our final destination just yet.
When we last left off in part four, we had added the necessary code to display thumbnail images next to our lists of inventory items. In this article, we will walk through the process of adding views for each individual item in our inventory such that when a user taps an item in the list view, she'll be presented with an item description scene that displays: 1) a bigger picture of the item, 2) the name of the item, and 3) the lengthy item description provided by the API. Let's jump right in.
The Item Description Scene
We will now set up our final story board scene. When the user taps on an inventory item from among those listed in the table view, we want to display a new view that provides an image at the top of the screen and below it a scrollable content area that displays the description text for the selected item. Create a new file, and name it PlumbingSupplyItemDescriptionViewController:

Switch over to the main storyboard and drag a view controller into the scene. Next, drag in an Image View and place it to the top of newly added view controller. Give the Image View a height of 160 points using the size inspector in the utilities panel. With the Image View selected, bring up the 'pin' popover view as shown below:
 Within the 'pin' view, uncheck the 'Constrain to margins' box and select the horizontal red bars and the top vertical red bar. Also check the 'Height' box as shown below:
 Finally, click the button that reads 'Add 4 Constraints.' If done correctly, you should see no red or yellow lines near the Image View:
 Now drag and drop a Text View into the scene, and size it as shown below with a small margin all around. (The vibrant color you see in the image below on the Text View was set by us so that it is clear what object we are referring to).
 While the Text View is selected, bring up the 'pin' menu again, uncheck the 'Constrain to margins' box, and select the horizontal red bars and the vertical red bars as shown below, and then add the constraints:
 We will now make the view controller that we dragged into our storyboard be of type PlumbingSupplyItemDescriptionViewController. Ensure that the view controller is selected. From the Identity Inspector menu locate the Class field and type in PlumbingSupplyItemDescriptionViewController as shown here:
 Open the Assistant Editor. You should now see the main storyboard with our selected view controller along with the corresponding class. To the top of this class add the following code:
Like so:

To link these IBOutlets (@IBOutlet) to the elements to our main storyboard, we select the given element on the story board with [control+left mouse button] and drag the blue line over to the corresponding variable as shown below:

Do this for both elements in the view controller (i.e. the image and the text), connecting them to the corresponding outlets in the class.
When we select a table view cell from our list of inventory items, we want our newly-added view controller to be presented to the user. To do this we will [control+left mouse button] from the table view cell located in each of our table view controllers and drag the blue line over to the new view controller. Do this for both table view controllers. When the drop down menu appears select 'Show.'
From Apple Docs: “The Navigation Bar provides a control for navigating hierarchical content. It’s a bar, typically displayed at the top of the screen, containing buttons for navigating within a hierarchy of screens." To prevent the Navigation Bar from overlapping our Image View, we need to set some properties in the main storyboard. Ensure that the newly-added view controller is selected. From the Attributes Inspector menu locate the check box labeled 'Under Top Bars' and uncheck it. Run the application, navigate to one of the two categories and select one of the item table view cell. You should see a view similar to the following:

Item Description Scene: Displaying Image and Text
When using storyboards with segues, the system provides a callback method to the source view controller for when the segue is about to be performed. This allows us to prepare the destination view controller for its presentation onto the screen. (A segue is triggered when we select a table view cell that was linked to some view controller using a storyboard segue.) Ensure that the callback method is located in the PlumbingSupplyInventoryTableViewController class like so (by default it is supplied in the class but commented out):
Uncomment this code block if it is commented out, and replace the comments in this callback method with the following snippet:
On the first line, the segue object provides a reference to the destination view controller. On the second line we cast the sender object that the callback method provides as a table view cell since the cell that was selected becomes the sender of this segue event. Then we grab the index of the selected cell, on line three, and use it to retrieve the associated plumbing supply item from our data source and send it over to the destination view controller on line four. To avoid having to download the image again we simply capture it in our destination view controller from the selected table view cell.
Now back to the destination view controller class, a.k.a the PlumbingSupplyItemDescriptionViewController. Define these three functions:
The viewDidAppear(animated: Bool) function is a system method that we override with custom behavior after the view appears onto the screen. In this method we set the title of the view controller to the name of the selected item and call a function that downloads the description of an item. Replace the comment, '// title and download //,' within this method with the following snippet:
Notice that the item description text is passed through a completion handler closure once the download is complete. The code 'self.bsn_textView.text = itemDescription' sets the Text View's text area with the text of the item description. On the source view controller, we did not use this completion handler, which is available on its networking request method, but instead made the UI updates inside the method itself. We prefer to update the UI outside of the method that is tasked to download content as it makes for clearer code by breaking up the variegated logic into separate sections. Both approaches are possible, as we'll now see.
In the function urlForItemWithDescription(itemID : String) -> (NSURL?) add the following lines of code:
This method takes an item's id, maps it one of two possible endpoints and inserts that item id into the selected endpoint. The mapping is done by inspecting the first two characters of an item's id and using a switch statement.
In the function, requestItem(endPointURL : NSURL?, responseHandler : (. . .) -> () ) -> (), add the following code:
This code should look familiar. We already described what this code does when we originally downloaded inventory items. The only difference here is that we passed our data for the UI element to the completion block.
For our final function, i.e. the system function viewDidLoad(), place the following code within it:
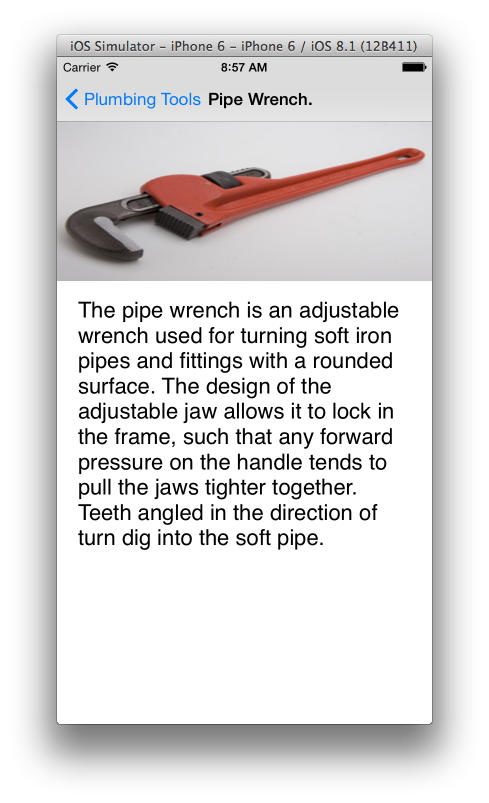
The first line of code takes the captured image that was assigned to us by the source view controller and insert it into our Image View. The second line sets the font type and size of the items description. The third line disables editing of the Text View since this functionality should not be applicable. The fourth line displays text that serves to indicate that there is activity with getting an items description. Run the application and navigate to the item description page. You should see a screen similar to the one depicted below:
 Success! With that, we've completed the last major task for our Super PHPlumbing Bros Swift client application! When run, the client queries our custom API to first display the titles of the two inventory categories supplied by the API. When the user selects one of those categories, the app displays a list view of the inventory and provides each item's name along with the corresponding thumbnail image. And finally, when the user selects an individual item, the app displays the full image along with the item's full description.
This project can be found on GitHub.
We hope you've found this tutorial series helpful and fun. As always, questions, comments and suggestions are welcome below!
Index
Introduction
Introduction and Overview: From the Back End API to the End User Application
The Web API
Building a RESTful API in PHP, Part 1
Building a RESTful API in PHP, Part 2
The Swift Client App
Networking in Swift: Building the Swift Client, Part 1
Networking in Swift: Building the Swift Client, Part 2
Networking in Swift: Building the Swift Client, Part 3
Networking in Swift: Building the Swift Client, Part 4
Networking in Swift: Building the Swift Client, Part 5
This tutorial was authored by Stefan Agapie, a Senior iOS Software Engineer, and adapted for the present piece.
When we last left off in part four, we had added the necessary code to display thumbnail images next to our lists of inventory items. In this article, we will walk through the process of adding views for each individual item in our inventory such that when a user taps an item in the list view, she'll be presented with an item description scene that displays: 1) a bigger picture of the item, 2) the name of the item, and 3) the lengthy item description provided by the API. Let's jump right in.
The Item Description Scene
We will now set up our final story board scene. When the user taps on an inventory item from among those listed in the table view, we want to display a new view that provides an image at the top of the screen and below it a scrollable content area that displays the description text for the selected item. Create a new file, and name it PlumbingSupplyItemDescriptionViewController:
Switch over to the main storyboard and drag a view controller into the scene. Next, drag in an Image View and place it to the top of newly added view controller. Give the Image View a height of 160 points using the size inspector in the utilities panel. With the Image View selected, bring up the 'pin' popover view as shown below:
Like so:
To link these IBOutlets (@IBOutlet) to the elements to our main storyboard, we select the given element on the story board with [control+left mouse button] and drag the blue line over to the corresponding variable as shown below:
Do this for both elements in the view controller (i.e. the image and the text), connecting them to the corresponding outlets in the class.
When we select a table view cell from our list of inventory items, we want our newly-added view controller to be presented to the user. To do this we will [control+left mouse button] from the table view cell located in each of our table view controllers and drag the blue line over to the new view controller. Do this for both table view controllers. When the drop down menu appears select 'Show.'
From Apple Docs: “The Navigation Bar provides a control for navigating hierarchical content. It’s a bar, typically displayed at the top of the screen, containing buttons for navigating within a hierarchy of screens." To prevent the Navigation Bar from overlapping our Image View, we need to set some properties in the main storyboard. Ensure that the newly-added view controller is selected. From the Attributes Inspector menu locate the check box labeled 'Under Top Bars' and uncheck it. Run the application, navigate to one of the two categories and select one of the item table view cell. You should see a view similar to the following:
Item Description Scene: Displaying Image and Text
When using storyboards with segues, the system provides a callback method to the source view controller for when the segue is about to be performed. This allows us to prepare the destination view controller for its presentation onto the screen. (A segue is triggered when we select a table view cell that was linked to some view controller using a storyboard segue.) Ensure that the callback method is located in the PlumbingSupplyInventoryTableViewController class like so (by default it is supplied in the class but commented out):
Uncomment this code block if it is commented out, and replace the comments in this callback method with the following snippet:
On the first line, the segue object provides a reference to the destination view controller. On the second line we cast the sender object that the callback method provides as a table view cell since the cell that was selected becomes the sender of this segue event. Then we grab the index of the selected cell, on line three, and use it to retrieve the associated plumbing supply item from our data source and send it over to the destination view controller on line four. To avoid having to download the image again we simply capture it in our destination view controller from the selected table view cell.
Now back to the destination view controller class, a.k.a the PlumbingSupplyItemDescriptionViewController. Define these three functions:
The viewDidAppear(animated: Bool) function is a system method that we override with custom behavior after the view appears onto the screen. In this method we set the title of the view controller to the name of the selected item and call a function that downloads the description of an item. Replace the comment, '// title and download //,' within this method with the following snippet:
Notice that the item description text is passed through a completion handler closure once the download is complete. The code 'self.bsn_textView.text = itemDescription' sets the Text View's text area with the text of the item description. On the source view controller, we did not use this completion handler, which is available on its networking request method, but instead made the UI updates inside the method itself. We prefer to update the UI outside of the method that is tasked to download content as it makes for clearer code by breaking up the variegated logic into separate sections. Both approaches are possible, as we'll now see.
In the function urlForItemWithDescription(itemID : String) -> (NSURL?) add the following lines of code:
This method takes an item's id, maps it one of two possible endpoints and inserts that item id into the selected endpoint. The mapping is done by inspecting the first two characters of an item's id and using a switch statement.
In the function, requestItem(endPointURL : NSURL?, responseHandler : (. . .) -> () ) -> (), add the following code:
This code should look familiar. We already described what this code does when we originally downloaded inventory items. The only difference here is that we passed our data for the UI element to the completion block.
For our final function, i.e. the system function viewDidLoad(), place the following code within it:
The first line of code takes the captured image that was assigned to us by the source view controller and insert it into our Image View. The second line sets the font type and size of the items description. The third line disables editing of the Text View since this functionality should not be applicable. The fourth line displays text that serves to indicate that there is activity with getting an items description. Run the application and navigate to the item description page. You should see a screen similar to the one depicted below:
This project can be found on GitHub.
We hope you've found this tutorial series helpful and fun. As always, questions, comments and suggestions are welcome below!
Index
Introduction
Introduction and Overview: From the Back End API to the End User Application
The Web API
Building a RESTful API in PHP, Part 1
Building a RESTful API in PHP, Part 2
The Swift Client App
Networking in Swift: Building the Swift Client, Part 1
Networking in Swift: Building the Swift Client, Part 2
Networking in Swift: Building the Swift Client, Part 3
Networking in Swift: Building the Swift Client, Part 4
Networking in Swift: Building the Swift Client, Part 5
This tutorial was authored by Stefan Agapie, a Senior iOS Software Engineer, and adapted for the present piece.
Networking in Swift: Building the Swift Client, Part 4
This is part four in our tutorial series on building a Swift client application to query a RESTful API and serve the response in a list view to the end user of our app. When we left off in part three, we had successfully created a list view of the items in the two inventories supplied by the API. But a simple list of item names isn't very exciting. Let's add thumbnail images to display alongside the item names in our inventory listings.
The images we'll display alongside our inventory items are not stored within our Xcode app bundle, rather, if you recall, they are served up by our custom API along with item id's, names, and descriptions. We will therefore download the inventory item images and display them to the left of our item names. You can download the image assets from our Git repository for the project here, so as not to have to create mock image files with the appropriate file names yourself. After you've downloaded the files, place them in an appropriate folder alongside the other files for your inventory API.
Multithreading in Swift
All user interface related events, touches as well as view updates, occur on the main thread. Thus, if we perform operations that take a long time to complete, this will block or prevent the user interface from responding and or updating view elements—this is not desired behavior since it makes for a terrible user experience. To prevent blocking the user interface from receiving touch events while we download an image, we will download images on a secondary thread.
To get images we need their URLs. Recall that within our item model object (i.e. our PlumbingSupplyItem class) we have a property called 'bsn_image'. This property holds a URL to a unique image that corresponds to the item name in the same model object.
In our PlumbingSupplyInventoryTableViewController class, we'll thus create an operation queue that will run on a thread other than the main thread. Toward the top of that class type the following line of code:
The string in the quotation marks here is completely arbitrary, and serves to avoid name collisions. In the function func tableView(tableView: UITableView, cellForRowAtIndexPath indexPath: NSIndexPath) -> UITableViewCell, add the following snippet:
The first line of code (line 2) gets the image URL for the cell that is about to appear onto the screen. We will use this URL to download the corresponding image. The second line of code (line 4) is a call to the dispatch system. It copies the code that is nested within the closure and places this copy on our backgroundQueue. The code within the closure comprises an operation. Our backgroundQueue will then dispatch the copied block of code at a system determined time—in the immediate future. This is known as executing an operation. (The code above is structured in such a way that, for each instance of a cell that appears onto the screen, an operation is spawned and placed onto our operation queue. For example, when our table view first loads we have at most the same amount of operations as there are visible cells.) For our next line of code, currently just a comment, we want to capture the index of the cell that is requesting this image download operation. As a result, each operation on our queue will have a record of the cell's index that requested this operation. Now place the following line of code under that comment (on line 6):
For our next lines of code, currently just a comment, we retrieve an image's URL and begin downloading it. The NSData class has the following method that will synchronously download some data from the provided URL. (Synchronously, in this context, means that the request will block our thread, but not the main thread, until the download is complete. This is desired because we want the image's data to download before proceeding to the next lines of code that processes and displays the images). Add the following code below the relevant comment:
On the next line of code we verify that the image was downloaded without a hitch. If the image failed to download, then the error object would not be nil. Since displaying an image in an already displaying cell is considered a user interface update, it must occur on the main thread or else our images will not get displayed. To accomplish this we will dispatch operations to the main queue; on the next line of code, the call to the dispatch system does just that. For our next line of code, currently just a comment, we create an UIImage object from the raw downloaded data. Place this line of code under the relevant comment:
The following line of code gets the index of the cell that corresponds to the cell that spawned this image download operation. Place this line of code under the relevant comment:
Now locate the if-statement with the text, '/* compare indices */', and replace the comment with the following line of code:
This if-statement compares the captured cell index to the cell's current index. If the captured cell index is equal to the current cell index, then the cell that requested the image is still on the screen. We therefore present the downloaded image by executing the code that is nested within this if-statement.
When scrolling the table view, the cells are reused to improve performance. When a cell is scrolled off the screen, instead of being purged from memory it is instead reused with a new index assigned to it. The issue is that when a cell is reused and subsequently redisplayed onto the screen, the cell spawns another image download operation which puts us in a state where we have more than one operation associated with any given cell.
To understand the issue here, suppose that the user scrolled the table view enough times that a single cell has four associated image download operations. When the individual operations complete their task, they message the cell by attempting to load an image into it. The visual result of four operations loading an image into one cell is a rapid succession of images changing as each operation loads its image. This behavior is not desired. Also, since the images may not download in the same order in which they were requested, we may wind up displaying the wrong image—this is bad!
The next two lines of code set the image on the current cell and tells the cell to lay out its cell for the newly provided image. Run the app and select one of the two plumbing supply categories. You should now see a table view with images and associated text as depicted below:
 Success! We've displayed the relevant thumbnail images alongside the names of the items in our inventory lists. We're almost done! In the next and final article in the series, we will construct our individual item detail views. But before we conclude, let's return to the image-display issue mentioned above.
To see the effect of allowing each operation to set a cell's image by not checking cell indices do the following. Comment out the if-statement: if currentIndex?.item == capturedIndex!.item). Now locate this line of code: self.dataSource = self.inventoryItems(data). Just below that line, load the data source multiple items by adding this line of code: for index in 1...5 { self.dataSource += self.dataSource; }.
Run the app and select one of the two categories. On an inventory items list page, quickly scroll down to the last element, you should see the images changing in rapid succession! To fix this effect, uncomment the if statement code only. Run the application again and quickly scroll to the last element. The issue should have been fixed.
It's good practice to cache data that is expensive to download. In our example, every time we scroll to a cell with an image that has already been shown, we don't request it from a local memory cache but instead download it every time. Our accompanying project repository contains sample code with a cache implementation. Simply comment out existing code and uncomment 'Version Two' sample code for a caching implementation—located in two places. If you run this implementation you will notice that the images load much faster when scrolling. This is highly desired behavior.
This project can be found on GitHub.
That's it for the present piece. In the final article in the series, we will construct our individual item detail views.
Index
Introduction
Introduction and Overview: From the Back End API to the End User Application
The Web API
Building a RESTful API in PHP, Part 1
Building a RESTful API in PHP, Part 2
The Swift Client App
Networking in Swift: Building the Swift Client, Part 1
Networking in Swift: Building the Swift Client, Part 2
Networking in Swift: Building the Swift Client, Part 3
Networking in Swift: Building the Swift Client, Part 4
Networking in Swift: Building the Swift Client, Part 5
This tutorial was authored by Stefan Agapie, a Senior iOS Software Engineer, and adapted for the present piece.
The images we'll display alongside our inventory items are not stored within our Xcode app bundle, rather, if you recall, they are served up by our custom API along with item id's, names, and descriptions. We will therefore download the inventory item images and display them to the left of our item names. You can download the image assets from our Git repository for the project here, so as not to have to create mock image files with the appropriate file names yourself. After you've downloaded the files, place them in an appropriate folder alongside the other files for your inventory API.
Multithreading in Swift
All user interface related events, touches as well as view updates, occur on the main thread. Thus, if we perform operations that take a long time to complete, this will block or prevent the user interface from responding and or updating view elements—this is not desired behavior since it makes for a terrible user experience. To prevent blocking the user interface from receiving touch events while we download an image, we will download images on a secondary thread.
To get images we need their URLs. Recall that within our item model object (i.e. our PlumbingSupplyItem class) we have a property called 'bsn_image'. This property holds a URL to a unique image that corresponds to the item name in the same model object.
In our PlumbingSupplyInventoryTableViewController class, we'll thus create an operation queue that will run on a thread other than the main thread. Toward the top of that class type the following line of code:
The string in the quotation marks here is completely arbitrary, and serves to avoid name collisions. In the function func tableView(tableView: UITableView, cellForRowAtIndexPath indexPath: NSIndexPath) -> UITableViewCell, add the following snippet:
The first line of code (line 2) gets the image URL for the cell that is about to appear onto the screen. We will use this URL to download the corresponding image. The second line of code (line 4) is a call to the dispatch system. It copies the code that is nested within the closure and places this copy on our backgroundQueue. The code within the closure comprises an operation. Our backgroundQueue will then dispatch the copied block of code at a system determined time—in the immediate future. This is known as executing an operation. (The code above is structured in such a way that, for each instance of a cell that appears onto the screen, an operation is spawned and placed onto our operation queue. For example, when our table view first loads we have at most the same amount of operations as there are visible cells.) For our next line of code, currently just a comment, we want to capture the index of the cell that is requesting this image download operation. As a result, each operation on our queue will have a record of the cell's index that requested this operation. Now place the following line of code under that comment (on line 6):
For our next lines of code, currently just a comment, we retrieve an image's URL and begin downloading it. The NSData class has the following method that will synchronously download some data from the provided URL. (Synchronously, in this context, means that the request will block our thread, but not the main thread, until the download is complete. This is desired because we want the image's data to download before proceeding to the next lines of code that processes and displays the images). Add the following code below the relevant comment:
On the next line of code we verify that the image was downloaded without a hitch. If the image failed to download, then the error object would not be nil. Since displaying an image in an already displaying cell is considered a user interface update, it must occur on the main thread or else our images will not get displayed. To accomplish this we will dispatch operations to the main queue; on the next line of code, the call to the dispatch system does just that. For our next line of code, currently just a comment, we create an UIImage object from the raw downloaded data. Place this line of code under the relevant comment:
The following line of code gets the index of the cell that corresponds to the cell that spawned this image download operation. Place this line of code under the relevant comment:
Now locate the if-statement with the text, '/* compare indices */', and replace the comment with the following line of code:
This if-statement compares the captured cell index to the cell's current index. If the captured cell index is equal to the current cell index, then the cell that requested the image is still on the screen. We therefore present the downloaded image by executing the code that is nested within this if-statement.
When scrolling the table view, the cells are reused to improve performance. When a cell is scrolled off the screen, instead of being purged from memory it is instead reused with a new index assigned to it. The issue is that when a cell is reused and subsequently redisplayed onto the screen, the cell spawns another image download operation which puts us in a state where we have more than one operation associated with any given cell.
To understand the issue here, suppose that the user scrolled the table view enough times that a single cell has four associated image download operations. When the individual operations complete their task, they message the cell by attempting to load an image into it. The visual result of four operations loading an image into one cell is a rapid succession of images changing as each operation loads its image. This behavior is not desired. Also, since the images may not download in the same order in which they were requested, we may wind up displaying the wrong image—this is bad!
The next two lines of code set the image on the current cell and tells the cell to lay out its cell for the newly provided image. Run the app and select one of the two plumbing supply categories. You should now see a table view with images and associated text as depicted below:
To see the effect of allowing each operation to set a cell's image by not checking cell indices do the following. Comment out the if-statement: if currentIndex?.item == capturedIndex!.item). Now locate this line of code: self.dataSource = self.inventoryItems(data). Just below that line, load the data source multiple items by adding this line of code: for index in 1...5 { self.dataSource += self.dataSource; }.
Run the app and select one of the two categories. On an inventory items list page, quickly scroll down to the last element, you should see the images changing in rapid succession! To fix this effect, uncomment the if statement code only. Run the application again and quickly scroll to the last element. The issue should have been fixed.
It's good practice to cache data that is expensive to download. In our example, every time we scroll to a cell with an image that has already been shown, we don't request it from a local memory cache but instead download it every time. Our accompanying project repository contains sample code with a cache implementation. Simply comment out existing code and uncomment 'Version Two' sample code for a caching implementation—located in two places. If you run this implementation you will notice that the images load much faster when scrolling. This is highly desired behavior.
This project can be found on GitHub.
That's it for the present piece. In the final article in the series, we will construct our individual item detail views.
Index
Introduction
Introduction and Overview: From the Back End API to the End User Application
The Web API
Building a RESTful API in PHP, Part 1
Building a RESTful API in PHP, Part 2
The Swift Client App
Networking in Swift: Building the Swift Client, Part 1
Networking in Swift: Building the Swift Client, Part 2
Networking in Swift: Building the Swift Client, Part 3
Networking in Swift: Building the Swift Client, Part 4
Networking in Swift: Building the Swift Client, Part 5
This tutorial was authored by Stefan Agapie, a Senior iOS Software Engineer, and adapted for the present piece.
Networking in Swift: Building the Swift Client, Part 3
This is part three in the tutorial segment on building a Swift client application to query a RESTful web API, from our series of articles on networking in Swift. In the first segment, we created a custom RESTful API in PHP that serves up the inventory of our hypothetical plumbing supply shop.
In this segment, we have been building a Swift client which queries this API and delivers that inventory content to our end user. In part one, we got our Swift application up and running. In part two of building the Swift client, we created our basic data model, hooked up the segues to our inventory views, and successfully handled raw responses from the server by printing them to the Xcode console.
In the present article, we'll create model objects from the JSON dictionary returned by the server (at the end of part two), and display our inventory item lists in their respective table view controllers.
Model Objects
When we left off in part two, we were filling out the requestInventory method in our PlumbingSupplyInventoryTableViewController. Currently, that method simply prints the returned JSON dictionary to the Xcode console. We'll now create model objects from this dictionary by factoring out the relevant code from the requestInventory method and placing them in a separate method to handle this logic. In your PlumbingSupplyInventoryTableViewController file, add the following method below the requestInventory function that we were working on in the previous article:
Notice that in the last line we do not print out the jsonResult dictionary object but instead wrap it in an array and return it to the caller. In the requestInventory method, replace the three lines of code we factored out into the new inventoryItems method with the following two lines of code:
If you run the app and select one of the two inventory item categories, you should see the same response as before in your console, but wrapped in an array. We'll now refine the raw JSON data. Replace the return [jsonResult] line of code in the inventoryItems method with the following snippet:
Let's take a closer look at this. The first line gets the raw data dictionary object from the JSON results container. The second line defines a container that will hold model objects that are built from the raw data dictionary objects from line one. Inside the for loop we iterate through the raw data dictionary objects and build an array of refined data objects. And in our last line we simply return the array of model objects.
If you now run the app again, you'll see the difference in the Xcode console output, which now returns a tidy array mapping individual inventory items to their memory locations. Let's display these inventory lists in their respective views.
Displaying Our Inventory Item List
Return to the main storyboard. Locate and select one of the table view cells from our PlumbingSupplyInventoryTableViewController scene. In the Attributes Inspector, locate the Style drop down menu and select the option “Basic.” Locate the Identifier field and type in “Cell”. Finally, locate the Accessory drop down menu and select the option “Disclosure Indicator.” Do the same for the other cell as well.
 Now open the file PlumbingSupplyInventoryTableViewController.swift file. Inside and toward the top of the class, add the following property:
This data source property will supply our dynamic table view cells with the information to display on screen. The number of items in our data source will always be equal to the number of items from a single plumbing supply inventory category. In the same class replace the default boilerplate code for the three methods below with the following snippets:
These data source methods are called by the system to query this controller on how to proceed when building our table view and displaying content within it. In the first method we simply tell the system that our table view will display only one section. The second method says that the number of items in our single table view section is equal to the number of items in our data source.
The last method does several things to build a table view cell. In the first line (line 12 in the snippet above) it dequeues a reusable cell. When scrolling a table view, table view cells that scroll off the screen are placed on a queue for reuse and cells that scroll onto the screen are removed from this queue and reused. This process helps speed up table view performance which makes possible the smooth table view scrolling with which we are all familiar. On the second line (line 13) we utilize the indexPath object to get the row number of the cell that is next to become visible in our table view; the row number corresponds to a unique item in our data source. There is a one-to-one correspondence between the cells and the items in our data source. The following line gets the name of an inventory item and assigns it to the label of the next cell to become visible. The last line simply returns that cell.
Let's jump back to where we defined our requestInventory function. In this method, replace this line of code that reads println(inventoryItems) with the following snippet:
What's going on here? In line 1, we capture a reference to the data source that is received from the self.inventoryItems(data) method call. The next segment is a C level API call to a dispatch system, on a queue of our choice, which executes code that we place inside its block/closure. The code inside the closure performs updates to our UI elements.
According to Apple's documentation, any code that updates UI elements must be executed on the main queue—which is what we do. The first line within the closure asks our table view to reload since we have assigned items to its data source. The second line hides the web activity indicator spinner, since our request for web content has terminated. Run the app and select on of the two plumbing supply categories. Once the content downloads you should see a table view similar to the one depicted below:

Success! We've successfully displayed the list of inventory items returned by the web API. Notice, however, that we did not use the callback responseHandler( error: nil, items: nil) closure but instead updated our UI in the method from above. We leave this as an exercise for the reader to implement. If you are not sure how to go about implementing this, don't worry, we wrote another method on a different controller that uses the closure to update its UI elements after an update. We do this towards the end of this tutorial.
This project can be found on GitHub.
We're almost done! In the next article, we'll display thumbnail images alongside each of the items in our inventory list above. And then in the final tutorial, we'll build our item description scene for each item in the inventory that displays the full image along with the extended description supplied by our API.
Index
Introduction
Introduction and Overview: From the Back End API to the End User Application
The Web API
Building a RESTful API in PHP, Part 1
Building a RESTful API in PHP, Part 2
The Swift Client App
Networking in Swift: Building the Swift Client, Part 1
Networking in Swift: Building the Swift Client, Part 2
Networking in Swift: Building the Swift Client, Part 3
Networking in Swift: Building the Swift Client, Part 4
Networking in Swift: Building the Swift Client, Part 5
This tutorial was authored by Stefan Agapie, a Senior iOS Software Engineer, and adapted for the present piece.
In this segment, we have been building a Swift client which queries this API and delivers that inventory content to our end user. In part one, we got our Swift application up and running. In part two of building the Swift client, we created our basic data model, hooked up the segues to our inventory views, and successfully handled raw responses from the server by printing them to the Xcode console.
In the present article, we'll create model objects from the JSON dictionary returned by the server (at the end of part two), and display our inventory item lists in their respective table view controllers.
Model Objects
When we left off in part two, we were filling out the requestInventory method in our PlumbingSupplyInventoryTableViewController. Currently, that method simply prints the returned JSON dictionary to the Xcode console. We'll now create model objects from this dictionary by factoring out the relevant code from the requestInventory method and placing them in a separate method to handle this logic. In your PlumbingSupplyInventoryTableViewController file, add the following method below the requestInventory function that we were working on in the previous article:
Notice that in the last line we do not print out the jsonResult dictionary object but instead wrap it in an array and return it to the caller. In the requestInventory method, replace the three lines of code we factored out into the new inventoryItems method with the following two lines of code:
If you run the app and select one of the two inventory item categories, you should see the same response as before in your console, but wrapped in an array. We'll now refine the raw JSON data. Replace the return [jsonResult] line of code in the inventoryItems method with the following snippet:
Let's take a closer look at this. The first line gets the raw data dictionary object from the JSON results container. The second line defines a container that will hold model objects that are built from the raw data dictionary objects from line one. Inside the for loop we iterate through the raw data dictionary objects and build an array of refined data objects. And in our last line we simply return the array of model objects.
If you now run the app again, you'll see the difference in the Xcode console output, which now returns a tidy array mapping individual inventory items to their memory locations. Let's display these inventory lists in their respective views.
Displaying Our Inventory Item List
Return to the main storyboard. Locate and select one of the table view cells from our PlumbingSupplyInventoryTableViewController scene. In the Attributes Inspector, locate the Style drop down menu and select the option “Basic.” Locate the Identifier field and type in “Cell”. Finally, locate the Accessory drop down menu and select the option “Disclosure Indicator.” Do the same for the other cell as well.
This data source property will supply our dynamic table view cells with the information to display on screen. The number of items in our data source will always be equal to the number of items from a single plumbing supply inventory category. In the same class replace the default boilerplate code for the three methods below with the following snippets:
These data source methods are called by the system to query this controller on how to proceed when building our table view and displaying content within it. In the first method we simply tell the system that our table view will display only one section. The second method says that the number of items in our single table view section is equal to the number of items in our data source.
The last method does several things to build a table view cell. In the first line (line 12 in the snippet above) it dequeues a reusable cell. When scrolling a table view, table view cells that scroll off the screen are placed on a queue for reuse and cells that scroll onto the screen are removed from this queue and reused. This process helps speed up table view performance which makes possible the smooth table view scrolling with which we are all familiar. On the second line (line 13) we utilize the indexPath object to get the row number of the cell that is next to become visible in our table view; the row number corresponds to a unique item in our data source. There is a one-to-one correspondence between the cells and the items in our data source. The following line gets the name of an inventory item and assigns it to the label of the next cell to become visible. The last line simply returns that cell.
Let's jump back to where we defined our requestInventory function. In this method, replace this line of code that reads println(inventoryItems) with the following snippet:
What's going on here? In line 1, we capture a reference to the data source that is received from the self.inventoryItems(data) method call. The next segment is a C level API call to a dispatch system, on a queue of our choice, which executes code that we place inside its block/closure. The code inside the closure performs updates to our UI elements.
According to Apple's documentation, any code that updates UI elements must be executed on the main queue—which is what we do. The first line within the closure asks our table view to reload since we have assigned items to its data source. The second line hides the web activity indicator spinner, since our request for web content has terminated. Run the app and select on of the two plumbing supply categories. Once the content downloads you should see a table view similar to the one depicted below:
Success! We've successfully displayed the list of inventory items returned by the web API. Notice, however, that we did not use the callback responseHandler( error: nil, items: nil) closure but instead updated our UI in the method from above. We leave this as an exercise for the reader to implement. If you are not sure how to go about implementing this, don't worry, we wrote another method on a different controller that uses the closure to update its UI elements after an update. We do this towards the end of this tutorial.
This project can be found on GitHub.
We're almost done! In the next article, we'll display thumbnail images alongside each of the items in our inventory list above. And then in the final tutorial, we'll build our item description scene for each item in the inventory that displays the full image along with the extended description supplied by our API.
Index
Introduction
Introduction and Overview: From the Back End API to the End User Application
The Web API
Building a RESTful API in PHP, Part 1
Building a RESTful API in PHP, Part 2
The Swift Client App
Networking in Swift: Building the Swift Client, Part 1
Networking in Swift: Building the Swift Client, Part 2
Networking in Swift: Building the Swift Client, Part 3
Networking in Swift: Building the Swift Client, Part 4
Networking in Swift: Building the Swift Client, Part 5
This tutorial was authored by Stefan Agapie, a Senior iOS Software Engineer, and adapted for the present piece.
Networking in Swift: Building the Swift Client, Part 2
In the first part of this tutorial segment on networking in Swift, we got our client app up and running with a simple table view controller listing the two inventories supplied by the RESTful API we created in the initial segment of the series. In the present article, we will: 1) set up our data model, 2) create the segues to our inventory views, and 3) process raw responses from the server asynchronously.
Building the Item Data Model
Our code looks better and becomes easier to manage when we build objects that represent or model the data items that we receive from our web service. To this end, we'll create a file for our individual plumbing supply items using a Cocoa Touch Class template, and then fill it out with the necessary parameters supplied by the API. Open up your Xcode project if you haven't already. In the Xcode Project Navigator panel, right click on the top most group folder. From the menu options that appear, select new file.

You will be presented with a set of options similar to this:

Under iOS, select Source, followed by Cocoa Touch Class, then click Next. Under the secondary menu options: next to the 'Class' field type in PlumbingSupplyItem. For the next field, 'Subclass of', type NSObject, do not create a XIB file (uncheck box), and for the Language portion ensure that Swift is selected:

Click 'Next'. When prompted to select a destination, place the file alongside the other project files. If the file is not automatically loaded into Xcode, then open it from the Project Navigator panel. Now place the following code within the PlumbingSupplyItem class implementation:
As you can see, this code block models the data item passed from the RESTful API we built in the previous segment of this tutorial series, initializing an item id, an item name, an associated image and an item description. It doesn't get much simpler than this.
Segues to the Inventory
With our data model in place, we'll now create our controller class for our inventory, using a table view. This will allow us to mediate between the two inventory table views upon a touch event by the end user.
In the same manner that we created the PlumbingSupplyItem model file, create a new file named PlumbingSupplyInventoryTableViewController using a Cocoa Touch template, and have this file subclass a UITableViewController. From the Object Library, located in the Utilities panel, drag and drop two UITableViewControllers into the main storyboard as depicted below:
 Select one of the two view controllers that were just dropped in. Now, in the Identity Inspector, located in the Utilities panel, find the Class field, and type in the name of the class we just created (i.e. PlumbingSupplyInventoryTableViewController) as shown below:
 Do the same for the other controller as well, since we are building two separate views of the same kind of object, i.e. items in each of our two inventories.
Note that when you are zoomed out in a storyboard, you can only make selections on the view controllers themselves. To make selections on a controller's internal elements, you have to zoom in. Armed with that information, go ahead and select the cell with the label 'Plumbing Tools'. While holding down the Control key and the left mouse button, drag your mouse over to the top right most view controller and release. During this motion you should see a blue line stretch from our starting location, the table view cell, to our final destination, the view controller.

Upon releasing your mouse button over the controller, a menu will appear. Select the top option that reads: Selection Segue->Show.

Now repeat the same steps for the other cell as well. Your storyboard should look like the following:
 What did we just accomplished? We have set up view controller view transition objects known as segues. These segues will respond to a user's touch of a cell. When a cell is pressed, the associated segue will transition to the view controller that it points to.
Preparing Our Segue
Since we will be using a single view controller to display the different inventories of plumbing supplies from the two possible options, namely, Plumbing Tools and Copper Pipes and Fittings, we need to inform the destination view controller which cell was selected. The tip of a segue arrow is said to point to the destination view controller and the tail of the arrow is said to originate from the source view controller. Create a file named PlumbingSupplyCategoriesTableViewController and have this file subclass a UITableViewController.
Now we'll hook it up on the story board. Select the source view controller, i.e. the controller with the two cells. In the Identity Inspector, located in the Utilities panel, where the field reads 'Class', type in the name of the file and class we just created: PlumbingSupplyCategoriesTableViewController. In the main storyboard, select the segue arrow that is associated with the cell labeled 'Plumbing Tools'. From the Attributes Inspector, located under the Utilities panel, locate the Identifier field and type in: plumbingTools.
 Do the same for the other segue arrow, but this time provide the Identifier with the name from the title of the other inventory list: copperPipesAndFittings.
We're now going to jump back to our code files. In the PlumbingSupplyInventoryTableViewController.swift file, place the following code (in line 3 below) immediately after the class definition, like so:
Now, over in the PlumbingSupplyCategoriesTableViewController.swift file, replace all the code inside the class PlumbingSupplyCategoriesTableViewController: UITableViewController { . . . } with the following snippet:
This is a system call method that is responsible for notifying the source view controller that a segue is about to be performed. The title that we set in the code above is to the destination table view controller that we segue to. On this destination controller we also set the plumbing inventory url endpoint so that the controller can load the content that was chosen by its corresponding table view cell. Our destination has enough information to load the entire inventory of the selected plumbing category.
Holding Pattern: Activity Indicator
Before we request a list of inventory items, it is customary to run an activity indicator to show the user that our app is in the process of getting some information to display. In the PlumbingSupplyInventoryTableViewController.swift file, below the line of code that reads var inventoryUrlEndpoint : String = "", enter the following line of code:
This line of code creates an instance of UIActivityIndicatorView and makes it private. Now we're going to fill it out inside the viewDidLoad method. In the same file, but inside the method override func viewDidLoad(), add the following lines:
Save all your files and run the application. Once it loads, segue to the two inventory table view controllers. You should see an activity indicator animation as shown here:
 Requesting an Inventory
Inside the PlumbingSupplyInventoryTableViewController.swift file, immediately below the webActivityIndicator property, we'll now define another variable that holds a reference to a URL session object that will asynchronously handle our web request. Enter the following line there:
If you are new to Swift, this function might look rather cryptic. That's because it is! It was no easy task to get this right—a whole lot of Google engineering was required on our end. Lets break it down by parameter:
'endPointURL : String'
- 'endPointURL' is an arbitrarily chosen parameter name that we defined in order to identify this parameter, and the 'String' portion requires that the passed in object be of string type.
'responseHandler'
- 'responseHandler' is an arbitrarily chosen name for our closure, a.k.a block in Objective-C.
'error : NSError?, items : Array<PlumbingSuppleyItem>?) → ()'
- This portion defines a closure.
- The 'error : NSError?' segment is again an arbitrarily chosen parameter name, and the 'NSError' portion requires that the passed in item be of NSError type.
- The question mark (?) indicates that the passed in object is optional, meaning that a nil may be provided—in its absence we are required to pass in a none nil value NSError object.
- 'items : Array<PlumbingSupplyItems>' indicates that the passed in object is a container that holds objects of PlumbingSupplyItem type.
- The arrow followed by the parenthesis '→ ()' indicates that this closure returns no values. Instead, objects are passed through the closure's callback parameters.
- The second arrow followed by parenthesis '→ ()' indicates that the function returns no values.
- The arrow along with the parenthesis may be omitted for both the function and closure.
Okay, that was a mouthful, but what happens when the view appears on the screen? Let's define it. Right below the viewDidLoad method, we add the following code for our new viewDidAppear method:
This function will be called by the system when the view appears onto the screen. This is good spot to begin requesting inventory items. Notice that we are calling our previously defined requestInventory function. Let's revisit that function now. Replace all the existing code inside the requestInventory method implementation, with the following snippet:
Let's go through this line by line. Line 1 creates an NSURL object from the provided endPointURL string that is referenced by a constant named url; it is essentially a wrapper object for a string formatted URL. This NSURL object is required by our urlSession object that is on the next line of code.
On this line of code, i.e. line 2, we create what is known as a 'data task' for querying our web service. This call spawns an asynchronous operation that communicates with our PHP web service without blocking the main thread. Not blocking the main thread is highly desired if we want our user interface to continue to be responsive—this makes for a better end user experience. Once the communication with our web service completes, the completionHandler closure and all of our code that is contained within this closure is executed. The closure has three parameters: 1) the raw data that comes from our web service, 2) a response object containing the headers from our web service response, or 3) an error object if the request failed.
Line 4 prints the response object inside the Xcode console.
Line 6 is a call to a closure that we defined for our requestInventory function. The parameters provided are an error object if any, and a list of data objects for our inventory items. Currently, we only return nil values.
Run the application the select both Plumbing Tools and Copper Pipes and Fittings table view cells. You should see the response objects printed for both selections in your Xcode console. The responses in your Xcode console should look similar to this:

Success! Notice that the response object is of type NSHTTPURLResponse. This response object contains information about the requesting url, and the header fields from our web services. Notice the status code of 200; this means that request was completed without issue. You can also print the data object but in its raw form it will not make much sense—try it if you'd like. The communiqué between the host and client is comprised of two parts. The first part is known as the head or header and the second part is known as the body. A typical request or response will contain both of these parts (It's possible to just request the head of a web service response—Google to find out how). The real-world analogy that is often used to describe this is paper mail. The electricity bill, for example, is comprised of two parts as well. The first part is the envelope itself that contains information about its sender—the head. The second part is the contents of the envelope that contains information for the recipient—the body.
JSON Parsing
Now let's get our raw inventory. To do this, we take the response or body of the message and translate it into a container that we can readily read from. In the same function that we've been working on, replace the following line of code that prints out the response, (i.e. println(response), line 4 in the snippet above) with the following:
The first line of code creates a parse error pointer to an object of type NSError, or nil value. On line 2, we call the NSJSONSerialization class method JSONObjectWithData(. . .) and pass to it our raw data response from our web service along with the memory address of the pointer that we created on the first line.
This last method will convert our raw data into a mutable container of type NSDictionary. If the conversion process fails, then this method will assign an error object to the provided memory address with a description or nature of the failure.
The last line of code simply prints our newly created container to the console screen. Save the file then build and run the application. Navigate to one of the inventory endpoints from the table view. In the Xcode console, you should see a similar response to this:

This project can be found on GitHub.
Success! Our application is now querying our tools and supplies API, and returning the inventory response for each of the categories listed on our primary view controller. In the next article in the series, we'll create model objects and then display our inventory item list in our Swift client. Continue to part three on building the Swift client.
Index
Introduction
Introduction and Overview: From the Back End API to the End User Application
The Web API
Building a RESTful API in PHP, Part 1
Building a RESTful API in PHP, Part 2
The Swift Client App
Networking in Swift: Building the Swift Client, Part 1
Networking in Swift: Building the Swift Client, Part 2
Networking in Swift: Building the Swift Client, Part 3
Networking in Swift: Building the Swift Client, Part 4
Networking in Swift: Building the Swift Client, Part 5
This tutorial was authored by Stefan Agapie, a Senior iOS Software Engineer, and adapted for the present piece.
Building the Item Data Model
Our code looks better and becomes easier to manage when we build objects that represent or model the data items that we receive from our web service. To this end, we'll create a file for our individual plumbing supply items using a Cocoa Touch Class template, and then fill it out with the necessary parameters supplied by the API. Open up your Xcode project if you haven't already. In the Xcode Project Navigator panel, right click on the top most group folder. From the menu options that appear, select new file.
You will be presented with a set of options similar to this:
Under iOS, select Source, followed by Cocoa Touch Class, then click Next. Under the secondary menu options: next to the 'Class' field type in PlumbingSupplyItem. For the next field, 'Subclass of', type NSObject, do not create a XIB file (uncheck box), and for the Language portion ensure that Swift is selected:
Click 'Next'. When prompted to select a destination, place the file alongside the other project files. If the file is not automatically loaded into Xcode, then open it from the Project Navigator panel. Now place the following code within the PlumbingSupplyItem class implementation:
As you can see, this code block models the data item passed from the RESTful API we built in the previous segment of this tutorial series, initializing an item id, an item name, an associated image and an item description. It doesn't get much simpler than this.
Segues to the Inventory
With our data model in place, we'll now create our controller class for our inventory, using a table view. This will allow us to mediate between the two inventory table views upon a touch event by the end user.
In the same manner that we created the PlumbingSupplyItem model file, create a new file named PlumbingSupplyInventoryTableViewController using a Cocoa Touch template, and have this file subclass a UITableViewController. From the Object Library, located in the Utilities panel, drag and drop two UITableViewControllers into the main storyboard as depicted below:
Note that when you are zoomed out in a storyboard, you can only make selections on the view controllers themselves. To make selections on a controller's internal elements, you have to zoom in. Armed with that information, go ahead and select the cell with the label 'Plumbing Tools'. While holding down the Control key and the left mouse button, drag your mouse over to the top right most view controller and release. During this motion you should see a blue line stretch from our starting location, the table view cell, to our final destination, the view controller.
Upon releasing your mouse button over the controller, a menu will appear. Select the top option that reads: Selection Segue->Show.
Now repeat the same steps for the other cell as well. Your storyboard should look like the following:
Preparing Our Segue
Since we will be using a single view controller to display the different inventories of plumbing supplies from the two possible options, namely, Plumbing Tools and Copper Pipes and Fittings, we need to inform the destination view controller which cell was selected. The tip of a segue arrow is said to point to the destination view controller and the tail of the arrow is said to originate from the source view controller. Create a file named PlumbingSupplyCategoriesTableViewController and have this file subclass a UITableViewController.
Now we'll hook it up on the story board. Select the source view controller, i.e. the controller with the two cells. In the Identity Inspector, located in the Utilities panel, where the field reads 'Class', type in the name of the file and class we just created: PlumbingSupplyCategoriesTableViewController. In the main storyboard, select the segue arrow that is associated with the cell labeled 'Plumbing Tools'. From the Attributes Inspector, located under the Utilities panel, locate the Identifier field and type in: plumbingTools.
We're now going to jump back to our code files. In the PlumbingSupplyInventoryTableViewController.swift file, place the following code (in line 3 below) immediately after the class definition, like so:
Now, over in the PlumbingSupplyCategoriesTableViewController.swift file, replace all the code inside the class PlumbingSupplyCategoriesTableViewController: UITableViewController { . . . } with the following snippet:
This is a system call method that is responsible for notifying the source view controller that a segue is about to be performed. The title that we set in the code above is to the destination table view controller that we segue to. On this destination controller we also set the plumbing inventory url endpoint so that the controller can load the content that was chosen by its corresponding table view cell. Our destination has enough information to load the entire inventory of the selected plumbing category.
Holding Pattern: Activity Indicator
Before we request a list of inventory items, it is customary to run an activity indicator to show the user that our app is in the process of getting some information to display. In the PlumbingSupplyInventoryTableViewController.swift file, below the line of code that reads var inventoryUrlEndpoint : String = "", enter the following line of code:
This line of code creates an instance of UIActivityIndicatorView and makes it private. Now we're going to fill it out inside the viewDidLoad method. In the same file, but inside the method override func viewDidLoad(), add the following lines:
Save all your files and run the application. Once it loads, segue to the two inventory table view controllers. You should see an activity indicator animation as shown here:
Inside the PlumbingSupplyInventoryTableViewController.swift file, immediately below the webActivityIndicator property, we'll now define another variable that holds a reference to a URL session object that will asynchronously handle our web request. Enter the following line there:
var urlSession = NSURLSession.sharedSession()At the bottom of the same class, we now define a function that will perform the url session request, parse the request and send us back objects if the success was successful. Here's our first stab:
If you are new to Swift, this function might look rather cryptic. That's because it is! It was no easy task to get this right—a whole lot of Google engineering was required on our end. Lets break it down by parameter:
'endPointURL : String'
- 'endPointURL' is an arbitrarily chosen parameter name that we defined in order to identify this parameter, and the 'String' portion requires that the passed in object be of string type.
'responseHandler'
- 'responseHandler' is an arbitrarily chosen name for our closure, a.k.a block in Objective-C.
'error : NSError?, items : Array<PlumbingSuppleyItem>?) → ()'
- This portion defines a closure.
- The 'error : NSError?' segment is again an arbitrarily chosen parameter name, and the 'NSError' portion requires that the passed in item be of NSError type.
- The question mark (?) indicates that the passed in object is optional, meaning that a nil may be provided—in its absence we are required to pass in a none nil value NSError object.
- 'items : Array<PlumbingSupplyItems>' indicates that the passed in object is a container that holds objects of PlumbingSupplyItem type.
- The arrow followed by the parenthesis '→ ()' indicates that this closure returns no values. Instead, objects are passed through the closure's callback parameters.
- The second arrow followed by parenthesis '→ ()' indicates that the function returns no values.
- The arrow along with the parenthesis may be omitted for both the function and closure.
Okay, that was a mouthful, but what happens when the view appears on the screen? Let's define it. Right below the viewDidLoad method, we add the following code for our new viewDidAppear method:
This function will be called by the system when the view appears onto the screen. This is good spot to begin requesting inventory items. Notice that we are calling our previously defined requestInventory function. Let's revisit that function now. Replace all the existing code inside the requestInventory method implementation, with the following snippet:
Let's go through this line by line. Line 1 creates an NSURL object from the provided endPointURL string that is referenced by a constant named url; it is essentially a wrapper object for a string formatted URL. This NSURL object is required by our urlSession object that is on the next line of code.
On this line of code, i.e. line 2, we create what is known as a 'data task' for querying our web service. This call spawns an asynchronous operation that communicates with our PHP web service without blocking the main thread. Not blocking the main thread is highly desired if we want our user interface to continue to be responsive—this makes for a better end user experience. Once the communication with our web service completes, the completionHandler closure and all of our code that is contained within this closure is executed. The closure has three parameters: 1) the raw data that comes from our web service, 2) a response object containing the headers from our web service response, or 3) an error object if the request failed.
Line 4 prints the response object inside the Xcode console.
Line 6 is a call to a closure that we defined for our requestInventory function. The parameters provided are an error object if any, and a list of data objects for our inventory items. Currently, we only return nil values.
Run the application the select both Plumbing Tools and Copper Pipes and Fittings table view cells. You should see the response objects printed for both selections in your Xcode console. The responses in your Xcode console should look similar to this:
Success! Notice that the response object is of type NSHTTPURLResponse. This response object contains information about the requesting url, and the header fields from our web services. Notice the status code of 200; this means that request was completed without issue. You can also print the data object but in its raw form it will not make much sense—try it if you'd like. The communiqué between the host and client is comprised of two parts. The first part is known as the head or header and the second part is known as the body. A typical request or response will contain both of these parts (It's possible to just request the head of a web service response—Google to find out how). The real-world analogy that is often used to describe this is paper mail. The electricity bill, for example, is comprised of two parts as well. The first part is the envelope itself that contains information about its sender—the head. The second part is the contents of the envelope that contains information for the recipient—the body.
JSON Parsing
Now let's get our raw inventory. To do this, we take the response or body of the message and translate it into a container that we can readily read from. In the same function that we've been working on, replace the following line of code that prints out the response, (i.e. println(response), line 4 in the snippet above) with the following:
The first line of code creates a parse error pointer to an object of type NSError, or nil value. On line 2, we call the NSJSONSerialization class method JSONObjectWithData(. . .) and pass to it our raw data response from our web service along with the memory address of the pointer that we created on the first line.
This last method will convert our raw data into a mutable container of type NSDictionary. If the conversion process fails, then this method will assign an error object to the provided memory address with a description or nature of the failure.
The last line of code simply prints our newly created container to the console screen. Save the file then build and run the application. Navigate to one of the inventory endpoints from the table view. In the Xcode console, you should see a similar response to this:
This project can be found on GitHub.
Success! Our application is now querying our tools and supplies API, and returning the inventory response for each of the categories listed on our primary view controller. In the next article in the series, we'll create model objects and then display our inventory item list in our Swift client. Continue to part three on building the Swift client.
Index
Introduction
Introduction and Overview: From the Back End API to the End User Application
The Web API
Building a RESTful API in PHP, Part 1
Building a RESTful API in PHP, Part 2
The Swift Client App
Networking in Swift: Building the Swift Client, Part 1
Networking in Swift: Building the Swift Client, Part 2
Networking in Swift: Building the Swift Client, Part 3
Networking in Swift: Building the Swift Client, Part 4
Networking in Swift: Building the Swift Client, Part 5
This tutorial was authored by Stefan Agapie, a Senior iOS Software Engineer, and adapted for the present piece.
Networking in Swift: Building the Swift Client, Part 1
If you've been following along from the beginning of this tutorial series on networking in Swift, you're now running a local web server and have created a simple RESTful API in PHP that serves up the inventory for our hypothetical Super PHPlumbing Bros. project. In this segment of the series, we'll build the iOS Swift client to bring that content to our end user. In the present article, we'll start our Swift project from scratch and create a single view application using a table view controller that will serve as the primary interface to our inventory of plumbing tools and supplies.
In the Beginning . . .
Download and install the latest version of Xcode, if you haven't already, and fire it up. From the Xcode menu bar (or the Welcome screen) select File->New->Project. A window will appear with various options to choose from. In the left hand panel, under iOS, choose 'Application'. And in the main panel select 'Single View Application'. Then go ahead and click 'Next' as shown below.
 On the following window you will be asked to name your application. Name it what ever you like. Under the Language section select Swift from the drop down menu. Make sure that the build is for iPhone in the 'Devices' menu, and then click 'Next' again.
 You'll then be prompted to choose a location to house your project and will be given the option to place the project under source control. If you know how to use git for source control, then by all means use it! Otherwise, uncheck the box if it is already checked and click 'Create' to start up the project.
Displaying the Available Services
In our Swift application, we want to present the user with all the available services that our supply shop has to offer. Our custom API provides an interface to our inventory of Plumbing Tools as well as our inventory of Copper Pipes and Fittings. To present these options to the end user we are going to use a table view. So let's jump in. In the navigator panel (the left panel) of Xcode, locate and select the file named Main.storyboard.
 Once the main storyboard loads, scroll to the pre-loaded Single View Controller and select it. When properly selected its border will turn blue, as seen here:
 As we are going to use a table view, we can safely discard this default view controller. Delete the single View Controller by pressing the delete key on your keyboard, while the controller is selected. In the Utilities Panel on the right side of the Xcode interface, locate the Object Library submenu. Select a Table View Controller, and drag and drop it inside the main storyboard.
 While the new controller is selected, point your mouse toward Xcode's menu bar and select: Editor->Embed In->Navigation Controller. This embeds our selected Table View Controller into, you guessed it, a Navigation Controller.

 A Navigation Controller is a stack for managing the presentation order of our view controllers. Select the Table View situated inside the Table View Controller, and then select the Attributes Inspector from the Utilities Panel. Locate the 'Content' field and select 'Static Cells' from its drop down menu.

You should see three cells appear inside the Table View. We only need two such cells, as this is where the user will be presented with the option to browse either the Plumbing Tools inventory or the Copper Pipes and Fittings inventory. Delete the bottom cell by first selecting it, and then pressing the delete key on your keyboard. Now let's name our two primary interfaces. For each of the two remaining cells, select the cell, and then locate the 'Style' field in the Attributes Inspector panel. From the 'Style' drop down menu select 'Basic'.

Both table view cells should now display a label that reads 'Title'. Two clicks in rapid succession on a label will place it into edit mode. Modify the titles so that they read from top to bottom, 'Plumbing Tools' and 'Copper Pipes and Fittings', respectively.
 In order for the application to run, we need to specify the initial view controller that we want to load when the application first boots up. In the main storyboard, select the Navigation Controller. Then, in the Attributes Inspector menu, locate the check box that reads, 'Is Initial View Controller' and select it as shown below:
 In the top left corner of Xcode make sure that the active scheme is set, and click the play button to build and run the application. Once the iOS simulator starts up, your app should look like this:
 This project can be found on GitHub.
Success! We've built the primary view that will be presented to the end user when they open our iOS application. In part two of this segment, we'll begin building our data models. You can find part two in the tutorial on building the Swift client at the link.
Index
Introduction
Introduction and Overview: From the Back End API to the End User Application
The Web API
Building a RESTful API in PHP, Part 1
Building a RESTful API in PHP, Part 2
The Swift Client App
Networking in Swift: Building the Swift Client, Part 1
Networking in Swift: Building the Swift Client, Part 2
Networking in Swift: Building the Swift Client, Part 3
Networking in Swift: Building the Swift Client, Part 4
Networking in Swift: Building the Swift Client, Part 5
This tutorial was authored by Stefan Agapie, a Senior iOS Software Engineer, and adapted for the present piece.
In the Beginning . . .
Download and install the latest version of Xcode, if you haven't already, and fire it up. From the Xcode menu bar (or the Welcome screen) select File->New->Project. A window will appear with various options to choose from. In the left hand panel, under iOS, choose 'Application'. And in the main panel select 'Single View Application'. Then go ahead and click 'Next' as shown below.
Displaying the Available Services
In our Swift application, we want to present the user with all the available services that our supply shop has to offer. Our custom API provides an interface to our inventory of Plumbing Tools as well as our inventory of Copper Pipes and Fittings. To present these options to the end user we are going to use a table view. So let's jump in. In the navigator panel (the left panel) of Xcode, locate and select the file named Main.storyboard.
You should see three cells appear inside the Table View. We only need two such cells, as this is where the user will be presented with the option to browse either the Plumbing Tools inventory or the Copper Pipes and Fittings inventory. Delete the bottom cell by first selecting it, and then pressing the delete key on your keyboard. Now let's name our two primary interfaces. For each of the two remaining cells, select the cell, and then locate the 'Style' field in the Attributes Inspector panel. From the 'Style' drop down menu select 'Basic'.
Both table view cells should now display a label that reads 'Title'. Two clicks in rapid succession on a label will place it into edit mode. Modify the titles so that they read from top to bottom, 'Plumbing Tools' and 'Copper Pipes and Fittings', respectively.
Success! We've built the primary view that will be presented to the end user when they open our iOS application. In part two of this segment, we'll begin building our data models. You can find part two in the tutorial on building the Swift client at the link.
Index
Introduction
Introduction and Overview: From the Back End API to the End User Application
The Web API
Building a RESTful API in PHP, Part 1
Building a RESTful API in PHP, Part 2
The Swift Client App
Networking in Swift: Building the Swift Client, Part 1
Networking in Swift: Building the Swift Client, Part 2
Networking in Swift: Building the Swift Client, Part 3
Networking in Swift: Building the Swift Client, Part 4
Networking in Swift: Building the Swift Client, Part 5
This tutorial was authored by Stefan Agapie, a Senior iOS Software Engineer, and adapted for the present piece.
Networking in Swift: Building a RESTful API in PHP, Part 2
This is the third post in our tutorial series on networking in Swift. In the introductory article, we provided an overview of the project and set up our local server. In the next piece, we began building out our RESTful API in PHP, which will serve the inventory for our hypothetical Super PHPlumbing Bros. supply company to the custom Swift client we will construct in the final segment of the series.
If you've been following along thus far, you've set up your local server and completed building the first half of the API, which serves the inventory for the shop's supplies. In this article, we will complete our API by adding the necessary code to serve the content of our plumbing tools inventory.
Building the Plumbing Tools Interface
In creating the API for our plumbing tools interface, we will follow pretty much the same series of steps we took while building the plumbing supplies interface, continuing to add the necessary code to the bare bones API we started with in part one. Our skeletal structure now has some real meat on it. Your PlumbingAPI.php file should now look like this:
Jumping In . . .
Once again, let's begin toward the bottom, in the final else if block in the script, the plumbing tools API call, which begins at line 263 above. Replace the echo command in line 264 with the following code block, which contains the relevant response logic:
As in part one, this array constitutes the actual content of the relevant inventory, including item ids, names, image locations, and descriptions. Let's now write the necessary code to serve up our tools inventory without the lengthy descriptions. Appropriately, this will be placed in the plumbing_tools_inventory_without_description() function, located at line 140 in the full script file above. Replace the two lines of placeholder code in that function (lines 141 and 142) with the following snippet:
For this, we will add some code to the .htaccess file created in the introductory article to this series. Remember, using .htaccess files is not recommended for production environments, but it will serve us just fine for the purposes of our testing our Swift app. In your usual text editor, type in the following lines of code to the .htaccess file:
The syntax for the rewrite rule is as follows: RewriteRule Pattern Substitution [flags]. For the pattern argument we provided a regular expression (regex) to conduct the translation for us, as we would like to make it as generic as possible—in order to support multiple API signatures. The first RewriteRule interprets the single item with description inventory request for both copper pipes and fittings as well as plumbing tools. The second RewriteRule addresses requests for entire inventories. See this guide (.pdf) for more on regular expressions.
In the same file but just below the our last line, we'll now create the rewrite rules for version two of our API. Here are the rewrite rules for version two of our web service:
This url will also work: http://localhost:8888/api/v1/plumbing_tools/json. You can replace the json path with any other supported format.
Now point your browser here: http://localhost:8888/api/v1/plumbing_tools/pt12010.json. PT12010 is an item id value. This last web service request will respond by transmitting the relevant information along with description for the item matching the provided id.
Versioning
Placing web services with expanded or modified functionality into a separate folder is arguably the simplest versioning scheme to implement. There are other more complicated, and necessary, versioning schemes in use today. In our scheme, folder v1 is the earliest web service and v2 is the most recent. A number of arguments speak in favor of this implementation: there is no ambiguity about which web service version you are talking to, backward compatibility is maintained and you don't have to worry about creating dependency issues because each versioning folder contains the complete set of services.
Moving Forward
With that, we have completed our Super PHPlumbing Bros inventory API. Next week, we will move on to the final segment of this tutorial series and begin building the Swift client application that we will use to query the API and serve the content up to the end user. As always, comments, questions and suggestions are welcome below.

This project can be found on GitHub.
Index
Introduction
Introduction and Overview: From the Back End API to the End User Application
The Web API
Building a RESTful API in PHP, Part 1
Building a RESTful API in PHP, Part 2
The Swift Client App
Networking in Swift: Building the Swift Client, Part 1
Networking in Swift: Building the Swift Client, Part 2
Networking in Swift: Building the Swift Client, Part 3
Networking in Swift: Building the Swift Client, Part 4
Networking in Swift: Building the Swift Client, Part 5
This tutorial was authored by Stefan Agapie, a Senior iOS Software Engineer, and adapted for the present piece.
If you've been following along thus far, you've set up your local server and completed building the first half of the API, which serves the inventory for the shop's supplies. In this article, we will complete our API by adding the necessary code to serve the content of our plumbing tools inventory.
Building the Plumbing Tools Interface
In creating the API for our plumbing tools interface, we will follow pretty much the same series of steps we took while building the plumbing supplies interface, continuing to add the necessary code to the bare bones API we started with in part one. Our skeletal structure now has some real meat on it. Your PlumbingAPI.php file should now look like this:
Jumping In . . .
Once again, let's begin toward the bottom, in the final else if block in the script, the plumbing tools API call, which begins at line 263 above. Replace the echo command in line 264 with the following code block, which contains the relevant response logic:
// build payload //Save your PlumbingAPI.php file and point your browser to this url, http://localhost:8888/v1/PlumbingAPI.php?method=plumbing_tools&format=json. The response will appear as follows in your web browser:
$response['code'] = 1;
$response['api_version'] = '1.0.0';
$response['status'] = $api_response_code[ $response['code'] ]['HTTP Response'];
// if an 'item_id' was provided then return details for that item //
if ( $_GET['item_id'] ) {
$response['item_id'] = strtoupper($_GET['item_id']);
$response['data'] = plumbing_tool_item_details(strtoupper($_GET['item_id']));
}
// else return our entire inventory of plumbing tools //
else {
$response['data'] = plumbing_tools_inventory_without_description();
}
Plumbing Tools Inventory without Descriptions.Now let's add in our plumbing tools inventory. The relevant function begins at line 132 above (function plumbing_tools_inventory()). Replace the echo command with the following associative array:
Plumbing Tools Inventory.
{ "code": 1, "status": 200, "data": null, "api_version": "1.0.0" }
As in part one, this array constitutes the actual content of the relevant inventory, including item ids, names, image locations, and descriptions. Let's now write the necessary code to serve up our tools inventory without the lengthy descriptions. Appropriately, this will be placed in the plumbing_tools_inventory_without_description() function, located at line 140 in the full script file above. Replace the two lines of placeholder code in that function (lines 141 and 142) with the following snippet:
// pull our entire inventory of plumbing tools //
$inventory = plumbing_tools_inventory();
// container for plumbing tools inventory with omitted description //
$inventory_without_details = array();
// iterate over the array, duplicate the inventory without descriptions//
foreach ($inventory as $key=>$value) {
if (is_array($value)) {
$inventory_item = array();
foreach ($value as $subkey=>$subvalue) {
if ( strcasecmp($subkey,'description') != 0 )
$inventory_item[$subkey] = $subvalue;
}
$inventory_without_details[$key] = $inventory_item;
}
}
return $inventory_without_details;
Save your file and point your browser to this endpoint: http://localhost:8888/v1/PlumbingAPI.php?method=plumbing_tools&format=json. You should see a json response for our entire inventory of plumbing tools.
Now we'll work on serving individual plumbing tools along with their descriptions. Find the plumbing_tools_item_details($item_id) function at line 176 in the script above, and replace the place-holder code in lines 177 and 178 with the following block:
Now we'll work on serving individual plumbing tools along with their descriptions. Find the plumbing_tools_item_details($item_id) function at line 176 in the script above, and replace the place-holder code in lines 177 and 178 with the following block:
// pull our entire inventory of plumbing tools //
$inventory = plumbing_tools_inventory();
// container for item matching the provided item_id //
$inventory_item = array();
// iterate through our inventory and find the requested item //
foreach ($inventory as $key=>$value) {
if (is_array($value) && strcasecmp($value['id'], $item_id) == 0) {
foreach ($value as $subkey=>$subvalue) {
$inventory_item[$subkey] = $subvalue;
}
break;
}
}
return $inventory_item;
Save your php file and point your browser to this url:http://localhost:8888/v1/PlumbingAPI.php?method=plumbing_tools&item_id=PT12010&format=json. This is an endpoint to the first item from our json inventory response for plumbing tools. You should see the following response in your browser:
{
"code": 1,
"status": 200,
"data": {
"id": "PT12010",
"name": "Plunger.",
"image": "http://localhost:8888/assets/plunger.png",
"description": "Super-pliable industrial-rubber cup with tiered ridges forms ultra-tight seal on any size drain. The heavy-duty steel handle allows for maximum pressure forced down drain to source of clog. Designed to work effectively at any angle for hard-to-reach, low-clearance applications."
},
"api_version": "1.0.0",
"item_id": "PT12010"
}
Our API is almost complete! Besides json, you will typically encounter web APIs that support multiple formats. Let's have our API also support XML and HTML responses. Find the deliver_response($format, $api_response) function at line 23 in the API script above, and locate the "XML Response" else if block that begins at line 49. Currently, it only has a place holder comment indicating that this is where we will our XML response logic will live. Add the following code to that block:
// Set HTTP Response Content Type //
header('Content-Type: application/xml; charset=utf-8');
// initializing or creating array //
$data = $api_response['data'];
// Format data into an XML response //
$xml = '<?xml version="1.0" encoding="UTF-8" ?>' . "\n";
arrayToXml($data, $xml);
// Deliver formatted data //
echo $xml;
This is the next line. Notice that the HTML response logic is in the final else block of the same function. Replace the place-holder "// HTML Response //" comment with the following snippet:
// Set HTTP Response Content Type //
header('Content-Type: text/html; charset=utf-8');
// initializing ro creating array //
$data = $api_response['data'];
$payload = '';
$html = '';
if (is_array($data)) {
arrayToHTML($data, $html);
$payload = $html;
}
else {
$payload = $data;
}
// Deliver formatted data //
echo $payload;
Finally, we have to fill out the arrayToXml($data, $xml) and arrayToHTML($data, $html) functions referenced in these two snippets. Find the empty arrayToXml function at line 214 in the PHP script above, and add the following to its body:
// wrap XML with $wrap TAG //
if ($wrap != null) {
$xml .= "<$wrap>\n";
}
// main loop //
foreach ($array as $key=>$value) {
if(is_array($value)) {
// recursive call //
arrayToXml($value, $xml,'ITEM');
} else {
// set tags in uppercase if needed //
if ($upper == true) {
$key = strtoupper($key);
}
// append to XML string //
$xml .= "<$key>" . htmlspecialchars(trim($value)) . "</$key>";
}
}
// close tag if needed //
if ($wrap != null) {
$xml .= "</$wrap>\n";
}
Now locate the arrayToHTML function, located at line 224 in our PHP script above. Like its XML counterpart, it is currently empty. Add the following code to the body of the function:
// wrap html with $tag //
if ($tag != null) {
$html .= "<HTML>\n";
}
// main loop //
foreach ($array as $key=>$value) {
if(is_array($value)) {
// recursive call //
arrayToHTML($value, $html,'h1');
} else {
// set tags in uppercase if needed //
if ($upper == true) {
$key = strtoupper($key);
}
// append to XML string //
$html .= "<$key>" . strtoupper($key) . ' : ' . htmlspecialchars(trim($value)) . "</$key><br>";
}
}
// close tag if needed //
if ($tag != null) {
$html .= "</HTML>\n";
}
Save your file and point your browser to this endpoint: http://localhost:8888/v1/PlumbingAPI.php?method=plumbing_tools&item_id=PT12010&format=json . You should see a json response for our entire inventory of plumbing tools. If you type in xml instead of json, in the url, you should see an xml response. Also, typing in html will result in an html response.
Rejoice! We have completed what is arguably the hardest part of this tutorial!
Clean URLs
Although our URLs up to now were well-formed for the task, you will at times be restricted to use what is known as clean URLs to query a web service. Clean URLs are structured in such a way that the query portion of the URLs that we have been using thus far are instead inserted within the URL path. Simply put, instead of using this url, http://localhost:8888/v1/PlumbingAPI.php?method=plumbing_tools&format=json, to access our inventory of plumbing, we will setup a mechanism that supports this type, http://localhost:8888/api/v1/plumbing_tools.json, of URL as well. For this, we will add some code to the .htaccess file created in the introductory article to this series. Remember, using .htaccess files is not recommended for production environments, but it will serve us just fine for the purposes of our testing our Swift app. In your usual text editor, type in the following lines of code to the .htaccess file:
# Turn on the rewrite engineAny text after a pound character (#) is ignored by the interpreter of this file—it indicates a comment. The first non-comment line of code notifies the interpreter that we will be using rewrite rules. The other lines of code translate our clean url into a standard url that our web service can understand.
RewriteEngine on
# Rewrite Rules for version 1.0.0 api
# ###################################
# Access to a single inventory item
RewriteRule ^api/v1/([^\/]*)[/]([^\/]*)[//.](html|json|xml) /v1/PlumbingAPI.php?method=$1&item_id=$2&format=$3 [L]
# Access to entire inventory
RewriteRule ^api/v1/([^\/]*)[//.](html|json|xml) /v1/PlumbingAPI.php?method=$1&format=$2 [L]
The syntax for the rewrite rule is as follows: RewriteRule Pattern Substitution [flags]. For the pattern argument we provided a regular expression (regex) to conduct the translation for us, as we would like to make it as generic as possible—in order to support multiple API signatures. The first RewriteRule interprets the single item with description inventory request for both copper pipes and fittings as well as plumbing tools. The second RewriteRule addresses requests for entire inventories. See this guide (.pdf) for more on regular expressions.
In the same file but just below the our last line, we'll now create the rewrite rules for version two of our API. Here are the rewrite rules for version two of our web service:
# Rewrite Rules for version 2.0.0 apiSave your .htaccess file and point your browser to the following url: http://localhost:8888/api/v1/plumbing_tools.json. The web service should respond by sending you the entire inventory of plumbing tools.
# ###################################
# Access to a single inventory item
RewriteRule ^api/v2/([^\/]*)[/]([^\/]*)[//.](html|json|xml) /v2/PlumbingAPI.php?method=$1&item_id=$2&format=$3 [L]
# Access to entire inventory
RewriteRule ^api/v2/([^\/]*)[//.](html|json|xml) /v2/PlumbingAPI.php?method=$1&format=$2 [L]
This url will also work: http://localhost:8888/api/v1/plumbing_tools/json. You can replace the json path with any other supported format.
Now point your browser here: http://localhost:8888/api/v1/plumbing_tools/pt12010.json. PT12010 is an item id value. This last web service request will respond by transmitting the relevant information along with description for the item matching the provided id.
Versioning
Placing web services with expanded or modified functionality into a separate folder is arguably the simplest versioning scheme to implement. There are other more complicated, and necessary, versioning schemes in use today. In our scheme, folder v1 is the earliest web service and v2 is the most recent. A number of arguments speak in favor of this implementation: there is no ambiguity about which web service version you are talking to, backward compatibility is maintained and you don't have to worry about creating dependency issues because each versioning folder contains the complete set of services.
Moving Forward
With that, we have completed our Super PHPlumbing Bros inventory API. Next week, we will move on to the final segment of this tutorial series and begin building the Swift client application that we will use to query the API and serve the content up to the end user. As always, comments, questions and suggestions are welcome below.
This project can be found on GitHub.
Index
Introduction
Introduction and Overview: From the Back End API to the End User Application
The Web API
Building a RESTful API in PHP, Part 1
Building a RESTful API in PHP, Part 2
The Swift Client App
Networking in Swift: Building the Swift Client, Part 1
Networking in Swift: Building the Swift Client, Part 2
Networking in Swift: Building the Swift Client, Part 3
Networking in Swift: Building the Swift Client, Part 4
Networking in Swift: Building the Swift Client, Part 5
This tutorial was authored by Stefan Agapie, a Senior iOS Software Engineer, and adapted for the present piece.
Subscribe to:
Posts (Atom)